O nowej architekturze
Ta strona została przetłumaczona przez PageTurner AI (beta). Nie jest oficjalnie zatwierdzona przez projekt. Znalazłeś błąd? Zgłoś problem →
Od 2018 roku zespół React Native przeprojektował rdzeń frameworka, aby umożliwić programistom tworzenie aplikacji o wyższej jakości. W 2024 roku ta wersja React Native została przetestowana na dużą skalę i napędza aplikacje produkcyjne w Meta.
Termin Nowa Architektura odnosi się zarówno do nowej struktury frameworka, jak i prac nad jej udostępnieniem w open source.
Nowa Architektura jest dostępna do eksperymentalnego włączenia od React Native 0.68 z ciągłymi ulepszeniami w kolejnych wydaniach. Zespół pracuje obecnie nad uczynieniem jej domyślnym rozwiązaniem w ekosystemie open source React Native.
Dlaczego Nowa Architektura?
Po latach pracy z React Native zespół zidentyfikował ograniczenia uniemożliwiające tworzenie wysoce dopracowanych doświadczeń. Te fundamentalne wady istniejącej konstrukcji stały się impulsem do inwestycji w przyszłość frameworka.
Nowa Architektura odblokowuje możliwości niemożliwe do osiągnięcia w starszej strukturze.
Synchroniczny układ i efekty
Tworzenie adaptacyjnych interfejsów często wymaga pomiaru rozmiarów widoków i dynamicznego dostosowywania układu.
Obecnie używa się zdarzenia onLayout do uzyskania informacji o układzie. Aktualizacje stanu w callbacku onLayout mogą jednak być stosowane po renderowaniu, co powoduje widoczne dla użytkowników stany pośrednie i "skoki" wizualne.
Nowa Architektura całkowicie eliminuje ten problem dzięki synchronicznemu dostępowi do danych układu i odpowiednio zaplanowanym aktualizacjom, uniemożliwiając wyświetlanie stanów pośrednich.
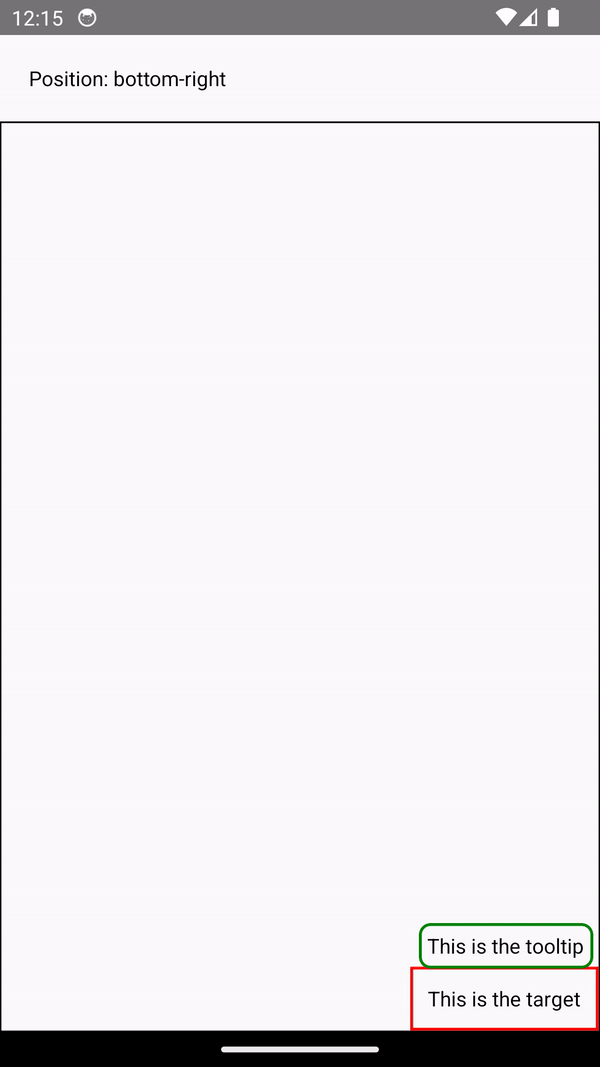
Example: Rendering a Tooltip
Measuring and placing a tooltip above a view allows us to showcase what synchronous rendering unlocks. The tooltip needs to know the position of its target view to determine where it should render.
In the current architecture, we use onLayout to get the measurements of the view and then update the positioning of the tooltip based on where the view is.
function ViewWithTooltip() {
  // ...

  // We get the layout information and pass to Tooltip to position itself
  const onLayout = React.useCallback(event => {
    targetRef.current?.measureInWindow((x, y, width, height) => {
      // This state update is not guaranteed to run in the same commit
      // This results in a visual "jump" as the Tooltip repositions itself
      setTargetRect({x, y, width, height});
    });
  }, []);

  return (
    <>
      <View ref={targetRef} onLayout={onLayout}>
        <Text>Some content that renders a tooltip above</Text>
      </View>
      <Tooltip targetRect={targetRect} />
    </>
  );
}
With the New Architecture, we can use useLayoutEffect to synchronously measure and apply layout updates in a single commit, avoiding the visual "jump".
function ViewWithTooltip() {
  // ...

  useLayoutEffect(() => {
    // The measurement and state update for `targetRect` happens in a single commit
    // allowing Tooltip to position itself without intermediate paints
    targetRef.current?.measureInWindow((x, y, width, height) => {
      setTargetRect({x, y, width, height});
    });
  }, [setTargetRect]);

  return (
    <>
      <View ref={targetRef}>
        <Text>Some content that renders a tooltip above</Text>
      </View>
      <Tooltip targetRect={targetRect} />
    </>
  );
}

Obsługa współbieżnego renderowania i funkcji
Nowa Architektura obsługuje współbieżne renderowanie i funkcje wprowadzone w React 18 i późniejszych. Możesz używać Suspense do pobierania danych, Transitions i innych nowych API React w kodzie natywnym, ujednolicając koncepcje między rozwojem webowym i mobilnym.
Współbieżny renderer zapewnia gotowe optymalizacje jak automatyczne grupowanie aktualizacji, redukujące liczbę ponownych renderowań.
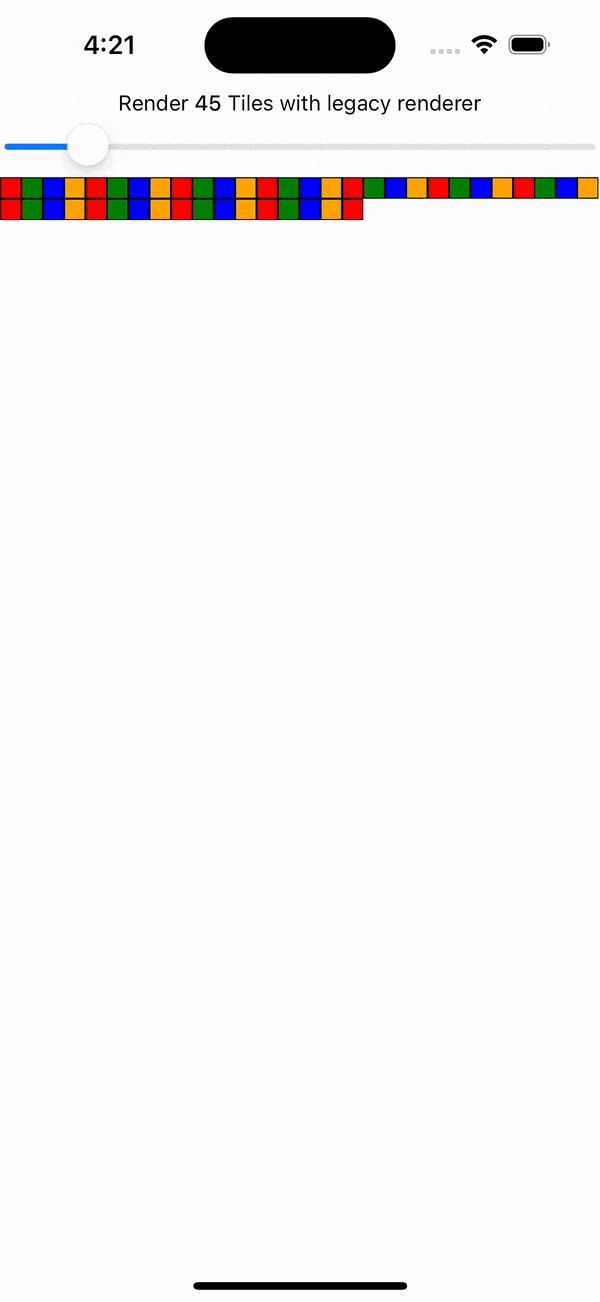
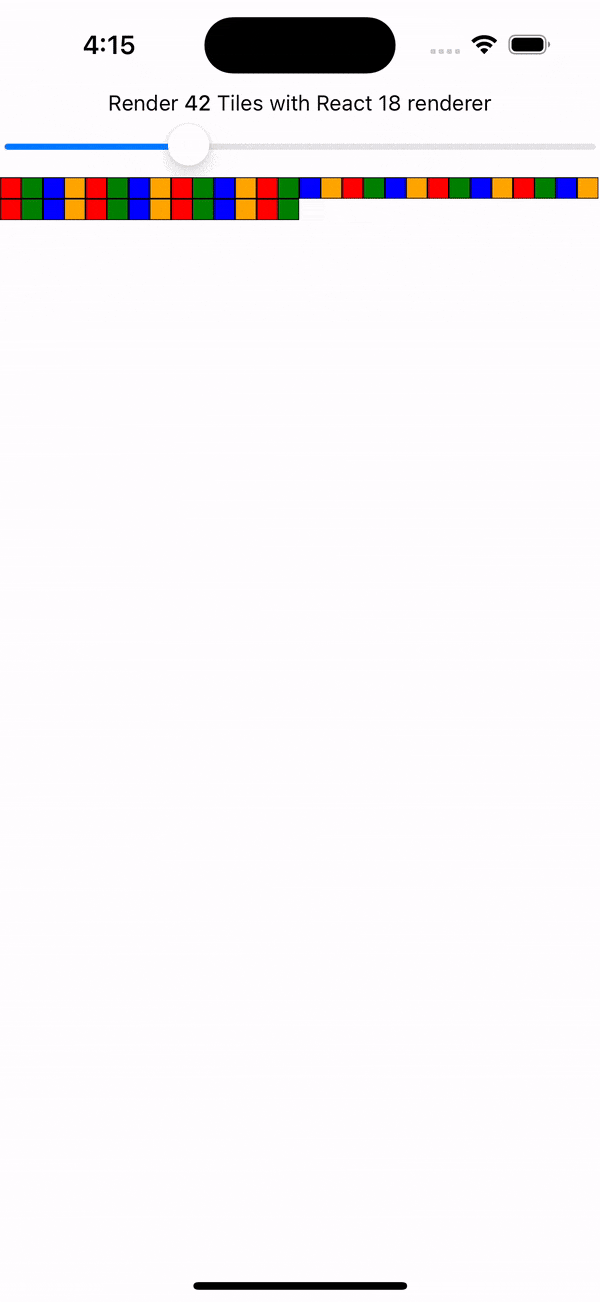
Example: Automatic Batching
With the New Architecture, you'll get automatic batching with the React 18 renderer.
In this example, a slider specifies how many tiles to render. Dragging the slider from 0 to 1000 will fire off a quick succession of state updates and re-renders.
In comparing the renderers for the same code, you can visually notice the renderer provides a smoother UI, with less intermediate UI updates. State updates from native event handlers, like this native Slider component, are now batched.
Funkcje jak Transitions umożliwiają określanie priorytetów aktualizacji UI. Oznaczenie aktualizacji jako niskopriorytetowej pozwala Reactowi "przerwać" renderowanie na rzecz ważniejszych zadań, gwarantując płynność interfejsu.
Example: Using startTransition
We can build on the previous example to showcase how transitions can interrupt in-progress rendering to handle a newer state update.
We wrap the tile number state update with startTransition to indicate that rendering the tiles can be interrupted. startTransition also provides a isPending flag to tell us when the transition is complete.
function TileSlider({value, onValueChange}) {
  const [isPending, startTransition] = useTransition();

  return (
    <>
      <View>
        <Text>
          Render {value} Tiles
        </Text>
        <ActivityIndicator animating={isPending} />
      </View>
      <Slider
        value={1}
        minimumValue={1}
        maximumValue={1000}
        step={1}
        onValueChange={newValue => {
          startTransition(() => {
            onValueChange(newValue);
          });
        }}
      />
    </>
  );
}

function ManyTiles() {
  const [value, setValue] = useState(1);
  const tiles = generateTileViews(value);
  return (
      <TileSlider onValueChange={setValue} value={value} />
      <View>
        {tiles}
      </View>
  )
}
You'll notice that with the frequent updates in a transition, React renders fewer intermediate states because it bails out of rendering the state as soon as it becomes stale. In comparison, without transitions, more intermediate states are rendered. Both examples still use automatic batching. Still, transitions give even more power to developers to batch in-progress renders.


Szybka komunikacja JavaScript/Native
Nowa Architektura zastępuje asynchroniczny most między JavaScript a kodem natywnym interfejsem JSI (JavaScript Interface). JSI umożliwia wzajemne referencje między JavaScript a C++, pozwalając na bezpośrednie wywołania metod bez kosztów serializacji.
Dzięki JSI biblioteka VisionCamera przetwarza klatki wideo w czasie rzeczywistym. Typowe bufory ramek (~30 MB) generują ~2 GB danych na sekundę – JSI bez problemu radzi sobie z takimi wolumenami, w przeciwieństwie do kosztownego mostu. JSI obsługuje też złożone typy jak bazy danych czy próbki audio.
Wdrożenie JSI w Nowej Architekturze eliminuje serializację ze wszystkich interakcji JavaScript-Native, w tym inicjalizacji i aktualizacji komponentów jak View czy Text. Więcej w naszej analizie wydajności renderowania i zmierzonych benchmarkach.
Czego oczekiwać po włączeniu Nowej Architektury?
Chociaż Nowa Architektura umożliwia te funkcje i ulepszenia, jej włączenie w twojej aplikacji lub bibliotece może nie przynieść natychmiastowej poprawy wydajności ani doświadczenia użytkownika.
Na przykład, twój kod może wymagać refaktoryzacji, aby wykorzystać nowe możliwości, takie jak synchroniczne efekty układu czy funkcje współbieżne. Chociaż JSI zminimalizuje narzut między pamięcią JavaScript a natywną, serializacja danych mogła nie być wąskim gardłem dla wydajności twojej aplikacji.
Włączenie Nowej Architektury w twojej aplikacji lub bibliotece to inwestycja w przyszłość React Native.
Zespół aktywnie bada i rozwija nowe możliwości, które odblokowuje Nowa Architektura. Przykładowo, dostosowanie do webu to obszar aktywnych badań w Meta, który trafi do ekosystemu open source React Native.
Możesz śledzić postępy i współtworzyć w naszym dedykowanym repozytorium dyskusji i propozycji.
Czy powinienem już teraz używać Nowej Architektury?
Od wersji 0.76 Nowa Architektura jest domyślnie włączona we wszystkich projektach React Native.
Jeśli zauważysz, że coś nie działa poprawnie, prosimy o zgłoszenie problemu za pomocą tego szablonu.
Jeśli z jakichkolwiek powodów nie możesz używać Nowej Architektury, nadal możesz z niej zrezygnować:
Android
-
Otwórz plik
android/gradle.properties -
Zmień flagę
newArchEnabledztruenafalse
# Use this property to enable support to the new architecture.
# This will allow you to use TurboModules and the Fabric render in
# your application. You should enable this flag either if you want
# to write custom TurboModules/Fabric components OR use libraries that
# are providing them.
-newArchEnabled=true
+newArchEnabled=false
iOS
-
Otwórz plik
ios/Podfile -
Dodaj
ENV['RCT_NEW_ARCH_ENABLED'] = '0'w głównej przestrzeni pliku Podfile (przykładowy Podfile w szablonie)
+ ENV['RCT_NEW_ARCH_ENABLED'] = '0'
# Resolve react_native_pods.rb with node to allow for hoisting
require Pod::Executable.execute_command('node', ['-p',
  'require.resolve(
- Zainstaluj zależności CocoaPods za pomocą polecenia:
bundle exec pod install