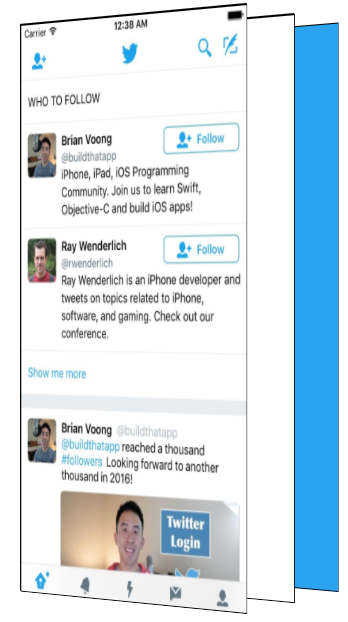
Twitter iOS 应用的加载动画让我非常喜欢。
当应用准备就绪时,Twitter 小鸟标志会优雅地展开,显露出应用界面。
我想探索如何在 React Native 中重现这个加载动画。
要理解构建方法,首先需要拆解加载动画的各个组成部分。观察细节最简单的方法是放慢速度观看。

这个动画包含几个关键部分需要我们实现:
-
小鸟标志的缩放
-
小鸟扩展时显示下方应用界面
-
最后阶段轻微缩小应用界面
我花了相当长时间才搞明白如何制作这个动画。
最初我有个错误假设:认为蓝色背景和小鸟是覆盖在应用上方的图层,随着小鸟放大逐渐变得透明从而显示下方应用。这种方法行不通,因为小鸟变透明后露出的会是蓝色背景,而不是应用界面!
幸运的是,亲爱的读者,您不必经历同样的挫折。本教程将带您直达关键实现部分!
正确的实现方式
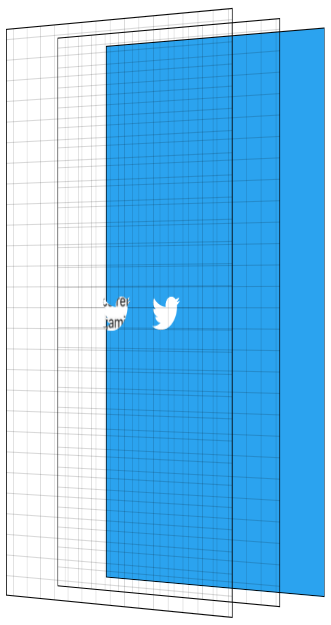
在编写代码前,理解如何拆解这个效果很重要。为帮助可视化,我在 CodePen 上重建了这个效果(嵌入在下方段落中),您可以交互式查看不同图层。
这个效果包含三个主要图层:最底层是蓝色背景层。虽然它看起来像是在应用上方,实际位于最后方。
中间是纯白色图层。最前面则是我们的应用层。
这个动画的核心技巧是将 Twitter 标志作为 mask(遮罩),同时遮盖应用层和白色层。关于遮罩细节我不做深入探讨,网上有大量相关资源。
在此背景下,遮罩的基本原理是:遮罩图像的不透明像素会显示被遮盖内容,而透明像素则隐藏被遮盖内容。
我们将 Twitter 标志作为遮罩,用它遮盖两个图层:纯白色层和应用层。
通过将遮罩放大到超过整个屏幕的尺寸来显示应用界面。
在遮罩放大过程中,我们逐渐增加应用层的不透明度,从而显示应用界面并隐藏后方的纯白层。最后阶段,我们将应用层从大于1的初始比例缩小至1。动画结束后隐藏非应用图层。
常言道一图胜千言。那么交互式可视化值多少词呢?点击"Next Step"按钮逐步查看动画效果。图层展示提供了侧视角度,网格线帮助可视化透明图层。
现在进入 React Native 实现
好的。既然我们理解了构建目标和动画原理,现在可以进入代码环节——这才是您阅读的真正目的。
实现的关键组件是 MaskedViewIOS,这是 React Native 的核心组件。
import {MaskedViewIOS} from 'react-native';

<MaskedViewIOS maskElement={<Text>Basic Mask</Text>}>
  <View style={{backgroundColor: 'blue'}} />
</MaskedViewIOS>;
MaskedViewIOS 接收 maskElement 和 children 两个 props。子元素会被 maskElement 遮罩。注意遮罩不必须是图片,它可以是任意视图。上述示例的效果是渲染蓝色视图,但仅通过 maskElement 的 "Basic Mask" 文字区域可见。我们刚刚创建了复杂的蓝色文字效果。
我们需要先渲染蓝色背景层,然后在顶部用 Twitter 标志遮罩来渲染应用层和白色层。
{
  fullScreenBlueLayer;
}
<MaskedViewIOS
  style={{flex: 1}}
  maskElement={
    <View style={styles.centeredFullScreen}>
      <Image source={twitterLogo} />
    </View>
  }>
  {fullScreenWhiteLayer}
  <View style={{flex: 1}}>
    <MyApp />
  </View>
</MaskedViewIOS>;
这样就能得到下图所示的层级结构。
动画实现部分
现在我们已经准备好所有组件,下一步是添加动画效果。为了让动画更流畅,我们将使用 React Native 的 Animated API。
Animated 允许我们在 JavaScript 中声明式地定义动画。默认情况下,这些动画在 JavaScript 线程运行,并逐帧通知原生层更新。但由于 JavaScript 无法保证每帧及时更新,可能导致掉帧(卡顿)—— 这绝非我们想要的效果!
Animated 提供了特殊机制避免卡顿:通过设置 useNativeDriver 标志,可以在动画开始时将定义从 JavaScript 发送到原生层,让原生端独立处理动画更新,无需每帧与 JavaScript 通信。useNativeDriver 的限制是只能修改特定属性(主要是 transform 和 opacity),目前无法用 useNativeDriver 实现背景色等属性的动画。当然,未来我们会扩展支持范围,也欢迎提交 PR 来增加项目所需属性,让整个社区受益 😀。
为确保动画流畅,我们将在这些约束条件下工作。深入了解 useNativeDriver 底层原理,请参阅相关博客文章。
分解动画步骤
我们的动画包含 4 个关键部分:
-
放大小鸟图标,逐渐显示应用和纯白层
-
淡入应用界面
-
轻微缩小应用界面
-
完成后隐藏白色层和蓝色层
Animated 提供两种主要动画定义方式:Animated.timing 可精确控制时长和缓动曲线;Animated.spring 则基于物理模型。使用 Animated.spring 时,你可以通过摩擦力和张力参数实现弹性效果。
由于多个动画需要同步进行(例如在遮罩展开中途开始淡入应用),且它们彼此关联,我们将使用 Animated.timing 配合单一 Animated.Value 实现。
Animated.Value 是封装动画状态值的容器。通常整个动画只需一个该值,大多数组件会将其存储在 state 中。
我们将动画视为随时间推进的连续过程:设置 Animated.Value 初始值为 0(0% 完成),最终值为 100(100% 完成)。
初始组件状态设置如下:
state = {
  loadingProgress: new Animated.Value(0),
};
准备启动动画时,通知 Animated 将该值渐变至 100。
Animated.timing(this.state.loadingProgress, {
toValue: 100,
duration: 1000,
useNativeDriver: true,
}).start();
接着我尝试估算动画各个部分在不同时间节点应有的参数值。下面列出了动画各组成部分的进度对应表,展示了随着时间推进各参数的理想变化值。

Twitter小鸟遮罩的初始缩放值应为1,在迅速放大前会先略微缩小。在动画进度10%时,其缩放值应为0.8,最终则放大至70。选择70这个值其实相当随意——它必须足够大才能完全显露下方内容,而60显然不够😀。有趣的是,这个最终值越大,缩放速度看起来就越快,因为必须在相同时间内达到更大倍数。经过反复调试才找到适合当前Logo的数值。不同尺寸的Logo/设备需要不同的最终缩放值,以确保完整显示屏幕内容。
应用界面需要保持不透明状态一段时间,至少要覆盖Logo缩小阶段。根据官方动画效果,我计划在小鸟放大到一半时开始显示应用界面,并快速完成过渡。因此在动画进度15%时开始显现,到30%时实现完全可见。
应用界面初始缩放值为1.1,随动画推进逐渐缩小至正常尺寸。
代码实现
上述过程本质是将整体动画进度映射到各独立元素的参数值。我们通过Animated的.interpolate方法实现这种映射。基于this.state.loadingProgress的插值计算,我们为动画的三个组成部分分别创建了对应的样式对象。
const loadingProgress = this.state.loadingProgress;
const opacityClearToVisible = {
opacity: loadingProgress.interpolate({
inputRange: [0, 15, 30],
outputRange: [0, 0, 1],
extrapolate: 'clamp',
}),
};
const imageScale = {
transform: [
{
scale: loadingProgress.interpolate({
inputRange: [0, 10, 100],
outputRange: [1, 0.8, 70],
}),
},
],
};
const appScale = {
transform: [
{
scale: loadingProgress.interpolate({
inputRange: [0, 100],
outputRange: [1.1, 1],
}),
},
],
};
获得这些样式对象后,就可以在渲染前文提到的视图片段时应用它们。注意只有Animated.View、Animated.Text和Animated.Image能使用包含Animated.Value的样式对象。
const fullScreenBlueLayer = (
  <View style={styles.fullScreenBlueLayer} />
);
const fullScreenWhiteLayer = (
  <View style={styles.fullScreenWhiteLayer} />
);

return (
  <View style={styles.fullScreen}>
    {fullScreenBlueLayer}
    <MaskedViewIOS
      style={{flex: 1}}
      maskElement={
        <View style={styles.centeredFullScreen}>
          <Animated.Image
            style={[styles.maskImageStyle, imageScale]}
            source={twitterLogo}
          />
        </View>
      }>
      {fullScreenWhiteLayer}
      <Animated.View
        style={[opacityClearToVisible, appScale, {flex: 1}]}>
        {this.props.children}
      </Animated.View>
    </MaskedViewIOS>
  </View>
);
太棒了!现在动画效果已符合预期,接下来只需清理不再需要的蓝色背景层和白色遮罩层。
要确定清理时机,我们需要监测动画完成状态。幸运的是,调用Animated.timing时,.start方法支持传入动画结束的回调函数。
Animated.timing(this.state.loadingProgress, {
  toValue: 100,
  duration: 1000,
  useNativeDriver: true,
}).start(() => {
  this.setState({
    animationDone: true,
  });
});
现在通过state中的状态值判断动画是否完成,我们可以据此控制蓝白图层的显隐逻辑。
const fullScreenBlueLayer = this.state.animationDone ? null : (
  <View style={[styles.fullScreenBlueLayer]} />
);
const fullScreenWhiteLayer = this.state.animationDone ? null : (
  <View style={[styles.fullScreenWhiteLayer]} />
);
大功告成!动画完美运行,结束后自动清理了辅助图层——我们成功复现了Twitter应用启动动画!
等等,我的代码不工作!
别担心,亲爱的读者。我也很反感那些只提供代码片段却不给完整源码的教程。
该组件已发布至npm,GitHub仓库名为react-native-mask-loader。您可以通过Expo在手机上直接体验:

延伸阅读/进阶挑战
-
这本Gitbook是学习Animated的绝佳资源,尤其适合已掌握React Native基础文档的开发者
-
实际Twitter动画在最后阶段会加速遮罩展开过程。尝试修改加载器,使用不同的缓动函数(或弹性动画)来模拟这种效果
-
当前遮罩的最终缩放值是硬编码的,在平板设备上可能无法完整显示内容。根据屏幕尺寸和图像大小动态计算最终缩放值会是很棒的PR改进