本页面由 PageTurner AI 翻译(测试版)。未经项目官方认可。 发现错误? 报告问题 →
原生组件
如果您需要创建_全新_的 React Native 组件来封装宿主组件,例如 Android 上特殊类型的复选框或 iOS 上的UIButton,那么您应该使用 Fabric 原生组件。
本指南将通过实现一个网页视图组件,向您展示如何构建 Fabric 原生组件。具体步骤如下:
-
使用 Flow 或 TypeScript 定义 JavaScript 规范
-
配置依赖管理系统以根据规范生成代码并实现自动链接
-
实现原生平台代码
-
在应用中使用该组件
您需要一个通过模板生成的空白应用来使用此组件:
npx @react-native-community/cli@latest init Demo --install-pods false
创建 WebView 组件
本指南将演示如何创建网页视图组件。我们将使用 Android 的 WebView 组件和 iOS 的 WKWebView 组件来实现。
首先创建用于存放组件代码的目录结构:
mkdir -p Demo/{specs,android/app/src/main/java/com/webview}
您将得到以下工作目录布局:
Demo
├── android/app/src/main/java/com/webview
└── ios
└── specs
-
android/app/src/main/java/com/webview目录存放 Android 代码 -
ios目录存放 iOS 代码 -
specs目录存放 Codegen 规范文件
1. 为 Codegen 定义规范
您的规范必须使用 TypeScript 或 Flow 定义(详见 Codegen 文档)。Codegen 将利用此规范生成 C++、Objective-C++ 和 Java 代码,用于连接平台代码和 React 运行的 JavaScript 运行时环境。
规范文件必须命名为 <MODULE_NAME>NativeComponent.{ts|js} 才能被 Codegen 识别。后缀 NativeComponent 不仅是命名约定,更是 Codegen 检测规范文件的实际依据。
以下是我们 WebView 组件的规范示例:
- TypeScript
- Flow
import type {HostComponent, ViewProps} from 'react-native';
import type {BubblingEventHandler} from 'react-native/Libraries/Types/CodegenTypes';
import codegenNativeComponent from 'react-native/Libraries/Utilities/codegenNativeComponent';

type WebViewScriptLoadedEvent = {
  result: 'success' | 'error';
};

export interface NativeProps extends ViewProps {
  sourceURL?: string;
  onScriptLoaded?: BubblingEventHandler<WebViewScriptLoadedEvent> | null;
}

export default codegenNativeComponent<NativeProps>(
  'CustomWebView',
) as HostComponent<NativeProps>;
// @flow strict-local

import type {HostComponent, ViewProps} from 'react-native';
import type {BubblingEventHandler} from 'react-native/Libraries/Types/CodegenTypes';
import codegenNativeComponent from 'react-native/Libraries/Utilities/codegenNativeComponent';

type WebViewScriptLoadedEvent = $ReadOnly<{|
  result: "success" | "error",
|}>;

type NativeProps = $ReadOnly<{|
  ...ViewProps,
  sourceURL?: string;
  onScriptLoaded?: BubblingEventHandler<WebViewScriptLoadedEvent>?;
|}>;

export default (codegenNativeComponent<NativeProps>(
  'CustomWebView',
): HostComponent<NativeProps>);
此规范主要包含三个部分(不含导入语句):
-
WebViewScriptLoadedEvent是事件从原生层传递到 JavaScript 层所需的数据支撑类型 -
NativeProps定义了可在组件上设置的属性 -
codegenNativeComponent语句用于生成自定义组件的代码,并定义组件名称以匹配原生实现
与原生模块类似,您可以在 specs/ 目录中存放多个规范文件。有关可用类型及其映射到平台类型的详细信息,请参阅附录。
2. 配置 Codegen 运行环境
React Native 的 Codegen 工具利用此规范生成平台特定的接口和样板代码。为此,Codegen 需要知道规范文件的位置和处理方式。请更新您的 package.json 文件包含:
    "start": "react-native start",
    "test": "jest"
  },
  "codegenConfig": {
    "name": "AppSpec",
    "type": "components",
    "jsSrcsDir": "specs",
    "android": {
      "javaPackageName": "com.webview"
    },
    "ios": {
      "componentProvider": {
        "CustomWebView": "RCTWebView"
      }
    }
  },
  "dependencies": {
完成 Codegen 配置后,需准备原生代码接入生成的接口。
请注意,在 iOS 平台上,我们通过声明式映射将规范导出的 JavaScript 组件名称 (CustomWebView) 与实现该组件的原生 iOS 类关联起来。
2. 编写原生代码
现在需要编写原生平台代码,确保当 React 需要渲染视图时,平台能够创建正确的原生视图并在屏幕上渲染。
您需要分别完成 Android 和 iOS 平台的开发工作。
本指南展示如何创建仅支持新架构的原生组件。如需同时支持新架构和旧架构,请参考我们的向后兼容指南。
- Android
- iOS
本页面由 PageTurner AI 翻译(测试版)。未经项目官方认可。 发现错误? 报告问题 →
现在需要编写 Android 平台代码来实现 WebView 的渲染功能。请按以下步骤操作:
-
运行 Codegen
-
编写
ReactWebView代码 -
编写
ReactWebViewManager代码 -
编写
ReactWebViewPackage代码 -
在应用中注册
ReactWebViewPackage
1. 通过 Gradle 运行 Codegen
运行一次此命令,生成 IDE 可用的基础模板代码。
cd android
./gradlew generateCodegenArtifactsFromSchema
Codegen 会生成需要实现的 ViewManager 接口以及 WebView 的 ViewManager 代理类。
2. 编写 ReactWebView
ReactWebView 是封装 Android 原生视图的组件,当使用自定义组件时 React Native 会渲染该视图。
在 android/src/main/java/com/webview 目录下创建 ReactWebView.java 或 ReactWebView.kt 文件并写入以下代码:
- Java
- Kotlin
package com.webview;

import android.content.Context;
import android.util.AttributeSet;
import android.webkit.WebView;
import android.webkit.WebViewClient;

import com.facebook.react.bridge.Arguments;
import com.facebook.react.bridge.WritableMap;
import com.facebook.react.bridge.ReactContext;
import com.facebook.react.uimanager.UIManagerHelper;
import com.facebook.react.uimanager.events.Event;

public class ReactWebView extends WebView {
  public ReactWebView(Context context) {
    super(context);
    configureComponent();
  }

  public ReactWebView(Context context, AttributeSet attrs) {
    super(context, attrs);
    configureComponent();
  }

  public ReactWebView(Context context, AttributeSet attrs, int defStyleAttr) {
    super(context, attrs, defStyleAttr);
    configureComponent();
  }

  private void configureComponent() {
    this.setLayoutParams(new LayoutParams(LayoutParams.MATCH_PARENT, LayoutParams.MATCH_PARENT));
    this.setWebViewClient(new WebViewClient() {
      @Override
      public void onPageFinished(WebView view, String url) {
        emitOnScriptLoaded(OnScriptLoadedEventResult.success);
      }
    });
  }

  public void emitOnScriptLoaded(OnScriptLoadedEventResult result) {
    ReactContext reactContext = (ReactContext) context;
    int surfaceId = UIManagerHelper.getSurfaceId(reactContext);
    EventDispatcher eventDispatcher = UIManagerHelper.getEventDispatcherForReactTag(reactContext, getId());
    WritableMap payload = Arguments.createMap();
    payload.putString("result", result.name());

    OnScriptLoadedEvent event = new OnScriptLoadedEvent(surfaceId, getId(), payload);
    if (eventDispatcher != null) {
      eventDispatcher.dispatchEvent(event);
    }
  }

  public enum OnScriptLoadedEventResult {
    success,
    error
  }

  private class OnScriptLoadedEvent extends Event<OnScriptLoadedEvent> {
    private final WritableMap payload;

    OnScriptLoadedEvent(int surfaceId, int viewId, WritableMap payload) {
      super(surfaceId, viewId);
      this.payload = payload;
    }

    @Override
    public String getEventName() {
      return "onScriptLoaded";
    }

    @Override
    public WritableMap getEventData() {
      return payload;
    }
  }
}
package com.webview

import android.content.Context
import android.util.AttributeSet
import android.webkit.WebView
import android.webkit.WebViewClient
import com.facebook.react.bridge.Arguments
import com.facebook.react.bridge.WritableMap
import com.facebook.react.bridge.ReactContext
import com.facebook.react.uimanager.UIManagerHelper
import com.facebook.react.uimanager.events.Event

class ReactWebView: WebView {
  constructor(context: Context) : super(context) {
    configureComponent()
  }

  constructor(context: Context, attrs: AttributeSet?) : super(context, attrs) {
    configureComponent()
  }

  constructor(context: Context, attrs: AttributeSet?, defStyleAttr: Int) : super(context, attrs, defStyleAttr) {
    configureComponent()
  }

  private fun configureComponent() {
    this.layoutParams = LayoutParams(LayoutParams.MATCH_PARENT, LayoutParams.MATCH_PARENT)
    this.webViewClient = object : WebViewClient() {
      override fun onPageFinished(view: WebView, url: String) {
        emitOnScriptLoaded(OnScriptLoadedEventResult.success)
      }
    }
  }

  fun emitOnScriptLoaded(result: OnScriptLoadedEventResult) {
    val reactContext = context as ReactContext
    val surfaceId = UIManagerHelper.getSurfaceId(reactContext)
    val eventDispatcher = UIManagerHelper.getEventDispatcherForReactTag(reactContext, id)
    val payload =
        Arguments.createMap().apply {
          putString("result", result.name)
        }
    val event = OnScriptLoadedEvent(surfaceId, id, payload)

    eventDispatcher?.dispatchEvent(event)
  }

  enum class OnScriptLoadedEventResult {
    success,
    error;
  }

  inner class OnScriptLoadedEvent(
      surfaceId: Int,
      viewId: Int,
      private val payload: WritableMap
  ) : Event<OnScriptLoadedEvent>(surfaceId, viewId) {
    override fun getEventName() = "onScriptLoaded"

    override fun getEventData() = payload
  }
}
ReactWebView 继承自 Android 的 WebView,因此可以直接复用平台已定义的所有属性。
该类定义了三个 Android 构造函数,但将实际实现委托给私有的 configureComponent 函数。此函数负责初始化所有组件特定属性:本示例中设置了 WebView 的布局,并定义了用于定制 WebView 行为的 WebClient。这段代码通过实现 WebClient 的 onPageFinished 方法,使 ReactWebView 能在页面加载完成时触发事件。
代码随后定义了实际触发事件的辅助函数。触发事件需要:
-
获取
ReactContext的引用; -
检索当前视图的
surfaceId; -
获取视图关联的
eventDispatcher引用; -
使用
WritableMap对象构建事件负载; -
创建需要发送给 JavaScript 的事件对象;
-
调用
eventDispatcher.dispatchEvent发送事件。
文件最后部分定义了发送事件所需的数据类型:
-
OnScriptLoadedEventResult:包含OnScriptLoaded事件的执行结果 -
实际的
OnScriptLoadedEvent:需继承 React Native 的Event类
3. 编写 WebViewManager
WebViewManager 是连接 React Native 运行时与原生视图的类。
当 React 接收到应用渲染特定组件的指令时,会使用已注册的视图管理器创建视图并传递所有必需属性。
以下是 ReactWebViewManager 的代码实现。
- Java
- Kotlin
package com.webview;

import com.facebook.react.bridge.ReactApplicationContext;
import com.facebook.react.module.annotations.ReactModule;
import com.facebook.react.uimanager.SimpleViewManager;
import com.facebook.react.uimanager.ThemedReactContext;
import com.facebook.react.uimanager.ViewManagerDelegate;
import com.facebook.react.uimanager.annotations.ReactProp;
import com.facebook.react.viewmanagers.CustomWebViewManagerInterface;
import com.facebook.react.viewmanagers.CustomWebViewManagerDelegate;

import java.util.HashMap;
import java.util.Map;

@ReactModule(name = ReactWebViewManager.REACT_CLASS)
class ReactWebViewManager extends SimpleViewManager<ReactWebView> implements CustomWebViewManagerInterface<ReactWebView> {
  private final CustomWebViewManagerDelegate<ReactWebView, ReactWebViewManager> delegate =
          new CustomWebViewManagerDelegate<>(this);

  @Override
  public ViewManagerDelegate<ReactWebView> getDelegate() {
    return delegate;
  }

  @Override
  public String getName() {
    return REACT_CLASS;
  }

  @Override
  public ReactWebView createViewInstance(ThemedReactContext context) {
    return new ReactWebView(context);
  }

  @ReactProp(name = "sourceUrl")
  @Override
  public void setSourceURL(ReactWebView view, String sourceURL) {
    if (sourceURL == null) {
      view.emitOnScriptLoaded(ReactWebView.OnScriptLoadedEventResult.error);
      return;
    }
    view.loadUrl(sourceURL, new HashMap<>());
  }

  public static final String REACT_CLASS = "CustomWebView";

  @Override
  public Map<String, Object> getExportedCustomBubblingEventTypeConstants() {
    Map<String, Object> map = new HashMap<>();
    Map<String, Object> bubblingMap = new HashMap<>();
    bubblingMap.put("phasedRegistrationNames", new HashMap<String, String>() {{
      put("bubbled", "onScriptLoaded");
      put("captured", "onScriptLoadedCapture");
    }});
    map.put("onScriptLoaded", bubblingMap);
    return map;
  }
}
package com.webview

import com.facebook.react.bridge.ReactApplicationContext;
import com.facebook.react.module.annotations.ReactModule;
import com.facebook.react.uimanager.SimpleViewManager;
import com.facebook.react.uimanager.ThemedReactContext;
import com.facebook.react.uimanager.ViewManagerDelegate;
import com.facebook.react.uimanager.annotations.ReactProp;
import com.facebook.react.viewmanagers.CustomWebViewManagerInterface;
import com.facebook.react.viewmanagers.CustomWebViewManagerDelegate;

@ReactModule(name = ReactWebViewManager.REACT_CLASS)
class ReactWebViewManager(context: ReactApplicationContext) : SimpleViewManager<ReactWebView>(), CustomWebViewManagerInterface<ReactWebView> {
  private val delegate: CustomWebViewManagerDelegate<ReactWebView, ReactWebViewManager> =
    CustomWebViewManagerDelegate(this)

  override fun getDelegate(): ViewManagerDelegate<ReactWebView> = delegate

  override fun getName(): String = REACT_CLASS

  override fun createViewInstance(context: ThemedReactContext): ReactWebView = ReactWebView(context)

  @ReactProp(name = "sourceUrl")
  override fun setSourceURL(view: ReactWebView, sourceURL: String?) {
    if (sourceURL == null) {
      view.emitOnScriptLoaded(ReactWebView.OnScriptLoadedEventResult.error)
      return;
    }
    view.loadUrl(sourceURL, emptyMap())
  }

  companion object {
    const val REACT_CLASS = "CustomWebView"
  }

  override fun getExportedCustomBubblingEventTypeConstants(): Map<String, Any> =
      mapOf(
          "onScriptLoaded" to
              mapOf(
                  "phasedRegistrationNames" to
                      mapOf(
                          "bubbled" to "onScriptLoaded",
                          "captured" to "onScriptLoadedCapture"
                      )))
}
ReactWebViewManager 继承自 React 的 SimpleViewManager 类,并实现由 Codegen 生成的 CustomWebViewManagerInterface 接口。
它持有 Codegen 生成的另一个元素 CustomWebViewManagerDelegate 的引用。
随后重写 getName 函数,该函数返回值必须与 spec 中 codegenNativeComponent 函数调用使用的名称一致。
createViewInstance 函数负责实例化新的 ReactWebView。
接下来,ViewManager 需要定义如何将所有 React 组件的属性(props)更新到原生视图。在示例中,您需要决定如何处理 React 将在 WebView 上设置的 sourceURL 属性。
最后,如果组件能够触发事件,您需要通过覆写 getExportedCustomBubblingEventTypeConstants(用于冒泡事件)或 getExportedCustomDirectEventTypeConstants(用于直接事件)来映射事件名称。
4. 编写 ReactWebViewPackage
与原生模块(Native Modules)类似,原生组件也需要实现 ReactPackage 类。这个对象用于在 React Native 运行时中注册组件。
以下是 ReactWebViewPackage 的代码:
- Java
- Kotlin
package com.webview;

import com.facebook.react.BaseReactPackage;
import com.facebook.react.bridge.NativeModule;
import com.facebook.react.bridge.ReactApplicationContext;
import com.facebook.react.module.model.ReactModuleInfo;
import com.facebook.react.module.model.ReactModuleInfoProvider;
import com.facebook.react.uimanager.ViewManager;

import java.util.Collections;
import java.util.HashMap;
import java.util.List;
import java.util.Map;

public class ReactWebViewPackage extends BaseReactPackage {
  @Override
  public List<ViewManager<?, ?>> createViewManagers(ReactApplicationContext reactContext) {
    return Collections.singletonList(new ReactWebViewManager(reactContext));
  }

  @Override
  public NativeModule getModule(String s, ReactApplicationContext reactApplicationContext) {
    if (ReactWebViewManager.REACT_CLASS.equals(s)) {
      return new ReactWebViewManager(reactApplicationContext);
    }
    return null;
  }

  @Override
  public ReactModuleInfoProvider getReactModuleInfoProvider() {
    return new ReactModuleInfoProvider() {
      @Override
      public Map<String, ReactModuleInfo> getReactModuleInfos() {
        Map<String, ReactModuleInfo> map = new HashMap<>();
        map.put(ReactWebViewManager.REACT_CLASS, new ReactModuleInfo(
                ReactWebViewManager.REACT_CLASS, // name
                ReactWebViewManager.REACT_CLASS, // className
                false,                           // canOverrideExistingModule
                false,                           // needsEagerInit
                false,                           // isCxxModule
                true                             // isTurboModule
        ));
        return map;
      }
    };
  }
}
package com.webview

import com.facebook.react.BaseReactPackage
import com.facebook.react.bridge.NativeModule
import com.facebook.react.bridge.ReactApplicationContext
import com.facebook.react.module.model.ReactModuleInfo
import com.facebook.react.module.model.ReactModuleInfoProvider
import com.facebook.react.uimanager.ViewManager

class ReactWebViewPackage : BaseReactPackage() {
  override fun createViewManagers(reactContext: ReactApplicationContext): List<ViewManager<*, *>> {
    return listOf(ReactWebViewManager(reactContext))
  }

  override fun getModule(s: String, reactApplicationContext: ReactApplicationContext): NativeModule? {
    when (s) {
      ReactWebViewManager.REACT_CLASS -> ReactWebViewManager(reactApplicationContext)
    }
    return null
  }

  override fun getReactModuleInfoProvider(): ReactModuleInfoProvider = ReactModuleInfoProvider {
    mapOf(ReactWebViewManager.REACT_CLASS to ReactModuleInfo(
      name = ReactWebViewManager.REACT_CLASS,
      className = ReactWebViewManager.REACT_CLASS,
      canOverrideExistingModule = false,
      needsEagerInit = false,
      isCxxModule = false,
      isTurboModule = true,
    )
    )
  }
}
ReactWebViewPackage 继承自 BaseReactPackage,并实现了正确注册组件所需的所有方法。
-
createViewManagers方法是用于创建管理自定义视图的ViewManager的工厂方法 -
getModule方法根据 React Native 需要渲染的视图返回对应的 ViewManager -
getReactModuleInfoProvider提供在运行时注册模块所需的所有信息
5. 在应用中注册 ReactWebViewPackage
最后,您需要在应用中注册 ReactWebViewPackage。具体做法是修改 MainApplication 文件,将 ReactWebViewPackage 添加到 getPackages 函数返回的包列表中。
package com.demo

import android.app.Application
import com.facebook.react.PackageList
import com.facebook.react.ReactApplication
import com.facebook.react.ReactHost
import com.facebook.react.ReactNativeHost
import com.facebook.react.ReactPackage
import com.facebook.react.defaults.DefaultNewArchitectureEntryPoint.load
import com.facebook.react.defaults.DefaultReactHost.getDefaultReactHost
import com.facebook.react.defaults.DefaultReactNativeHost
import com.facebook.react.soloader.OpenSourceMergedSoMapping
import com.facebook.soloader.SoLoader
import com.webview.ReactWebViewPackage

class MainApplication : Application(), ReactApplication {

  override val reactNativeHost: ReactNativeHost =
      object : DefaultReactNativeHost(this) {
        override fun getPackages(): List<ReactPackage> =
            PackageList(this).packages.apply {
              add(ReactWebViewPackage())
            }

        override fun getJSMainModuleName(): String = "index"

        override fun getUseDeveloperSupport(): Boolean = BuildConfig.DEBUG

        override val isNewArchEnabled: Boolean = BuildConfig.IS_NEW_ARCHITECTURE_ENABLED
        override val isHermesEnabled: Boolean = BuildConfig.IS_HERMES_ENABLED
      }

  override val reactHost: ReactHost
    get() = getDefaultReactHost(applicationContext, reactNativeHost)

  override fun onCreate() {
    super.onCreate()
    SoLoader.init(this, OpenSourceMergedSoMapping)
    if (BuildConfig.IS_NEW_ARCHITECTURE_ENABLED) {
      load()
    }
  }
}
本页面由 PageTurner AI 翻译(测试版)。未经项目官方认可。 发现错误? 报告问题 →
现在需要编写 iOS 平台代码来实现 Web 视图渲染。请按以下步骤操作:
-
运行 Codegen
-
编写
RCTWebView代码 -
在应用中注册
RCTWebView
1. 运行 Codegen
您可以手动运行 Codegen,但更简单的方式是通过组件演示应用自动执行此操作。
cd ios
bundle install
bundle exec pod install
请注意观察 Codegen 输出的日志信息,我们将在 Xcode 中使用这些日志来构建 WebView 原生组件。
注意:请谨慎将生成的代码提交到代码仓库。生成的代码与 React Native 的每个特定版本紧密相关。请使用 npm 的 peerDependencies 机制来限制与 React Native 版本的兼容范围。
3. 编写 RCTWebView
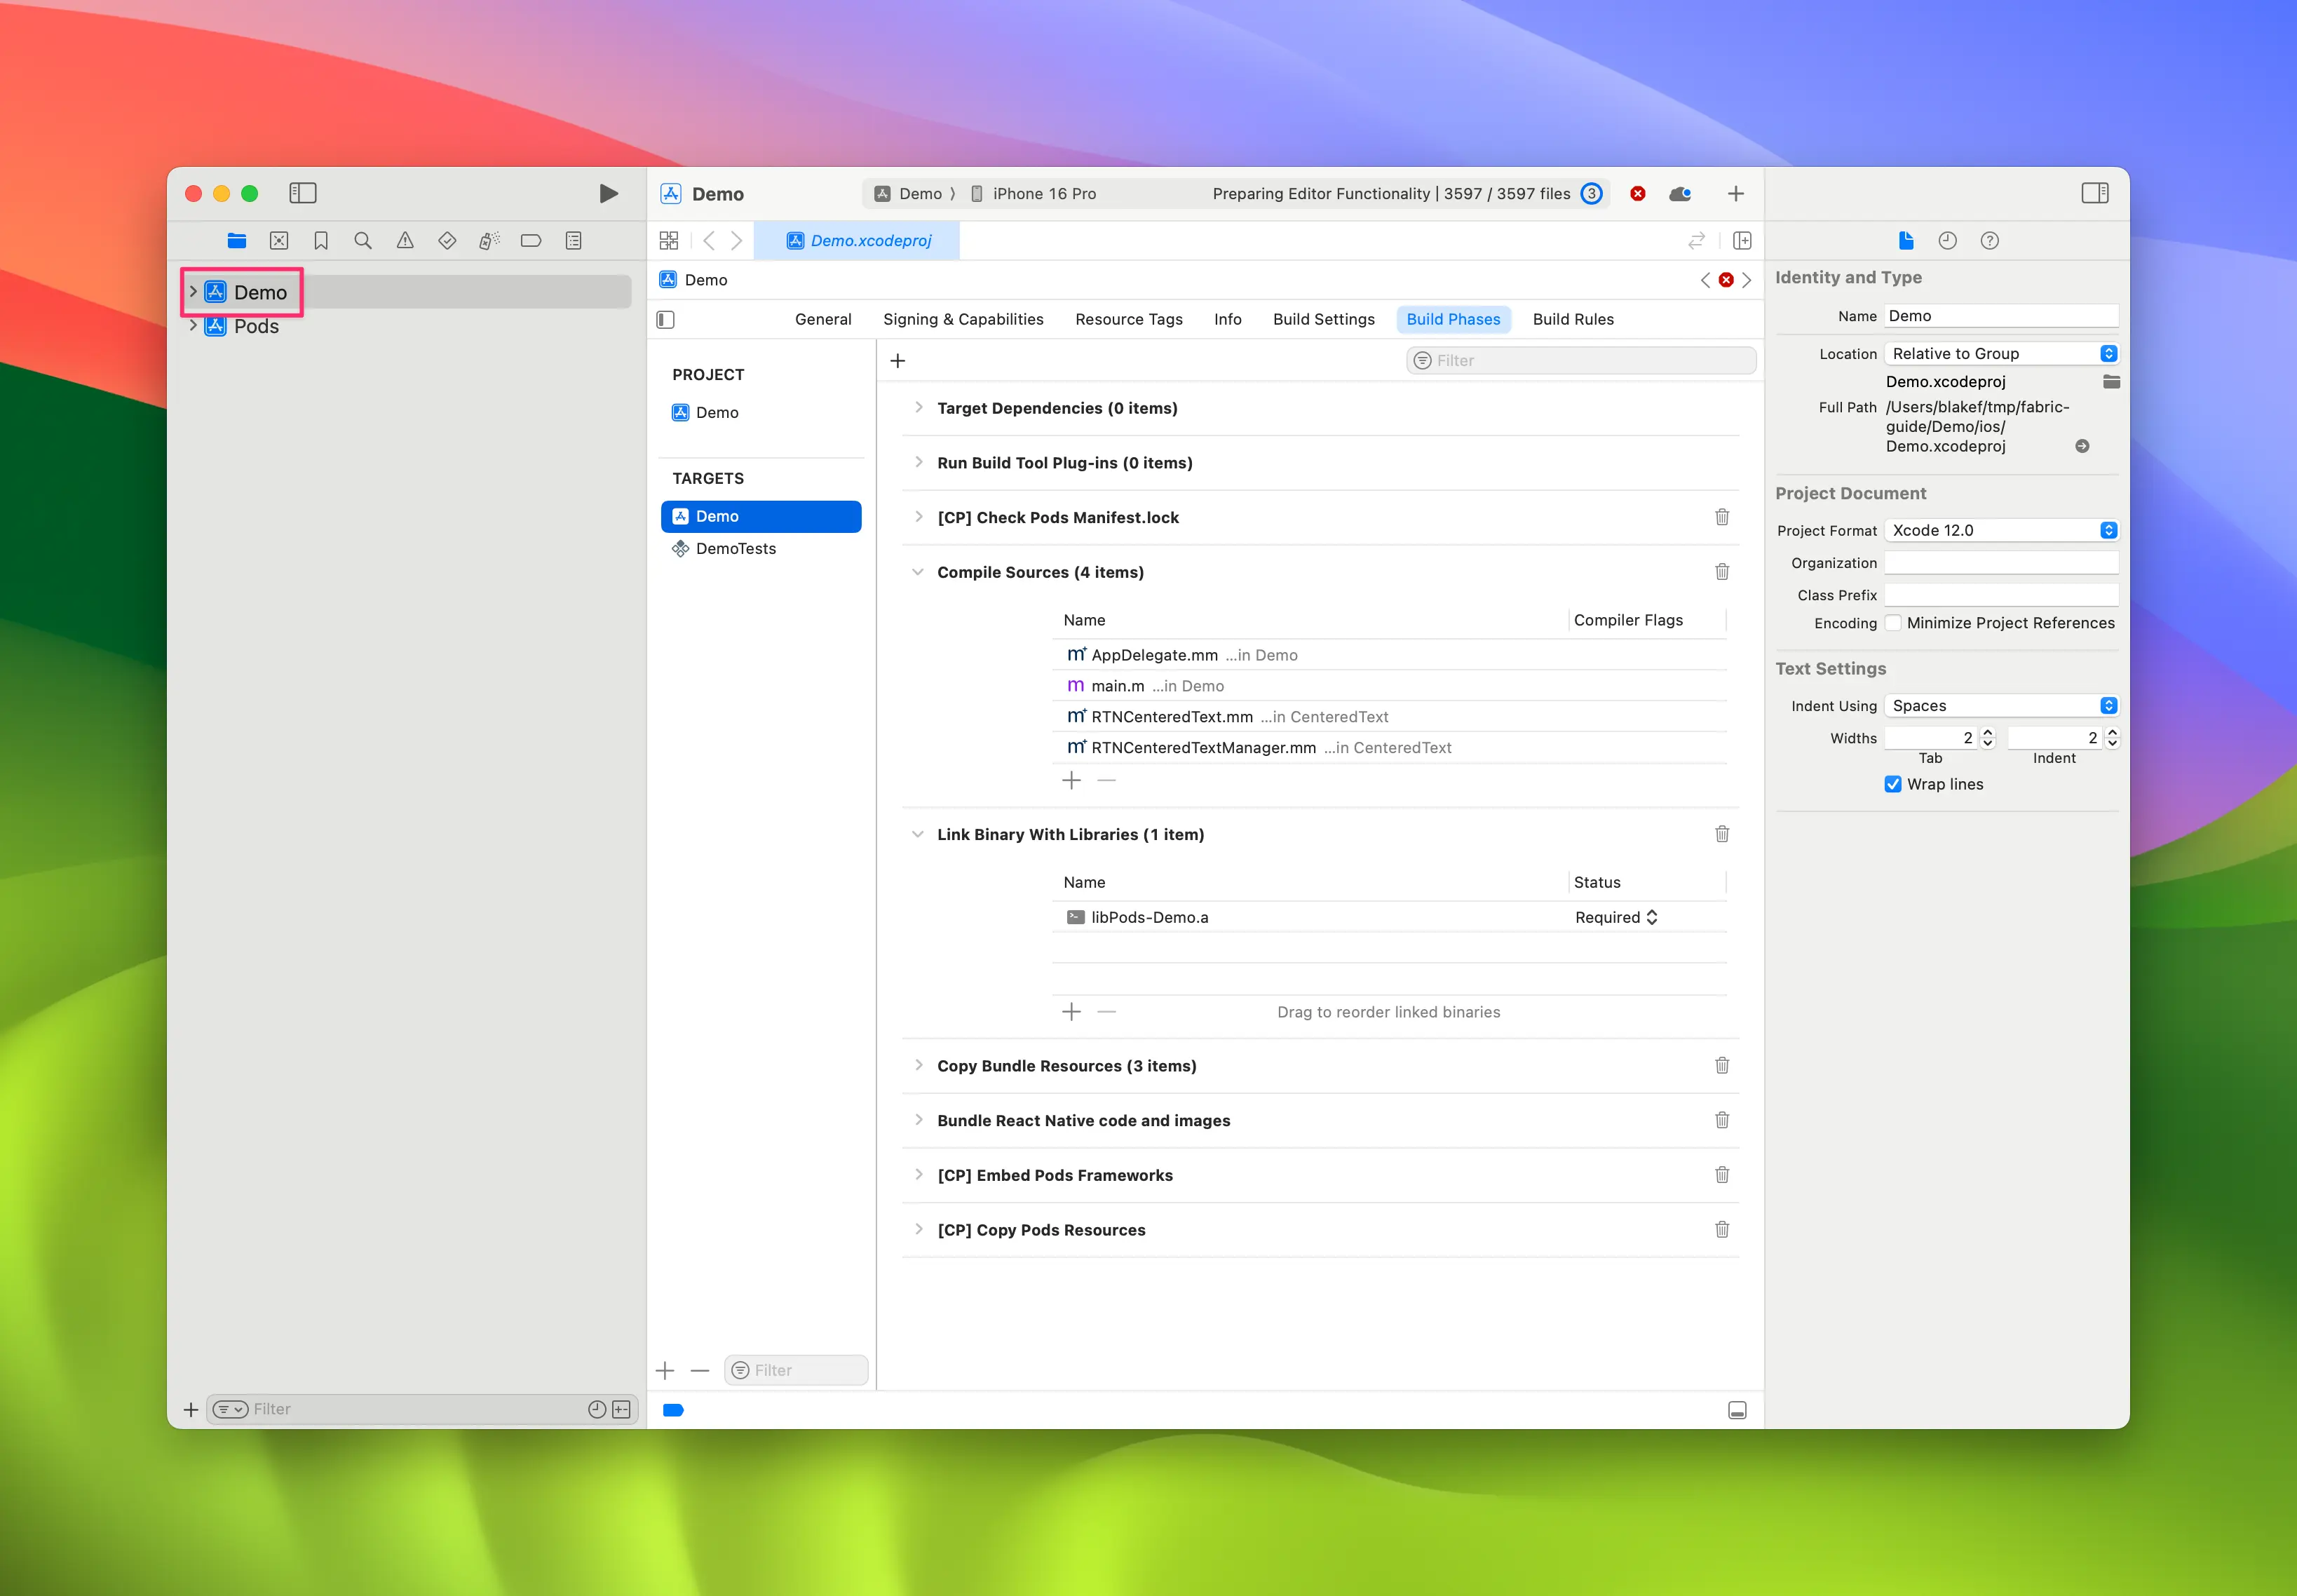
请通过以下 5 个步骤在 Xcode 中准备您的 iOS 项目:
- 打开 CocoaPods 生成的 Xcode Workspace:
cd ios
open Demo.xcworkspace
- 右键点击应用,选择
New Group,将新组命名为WebView

- 在
WebView组内创建New→File from Template
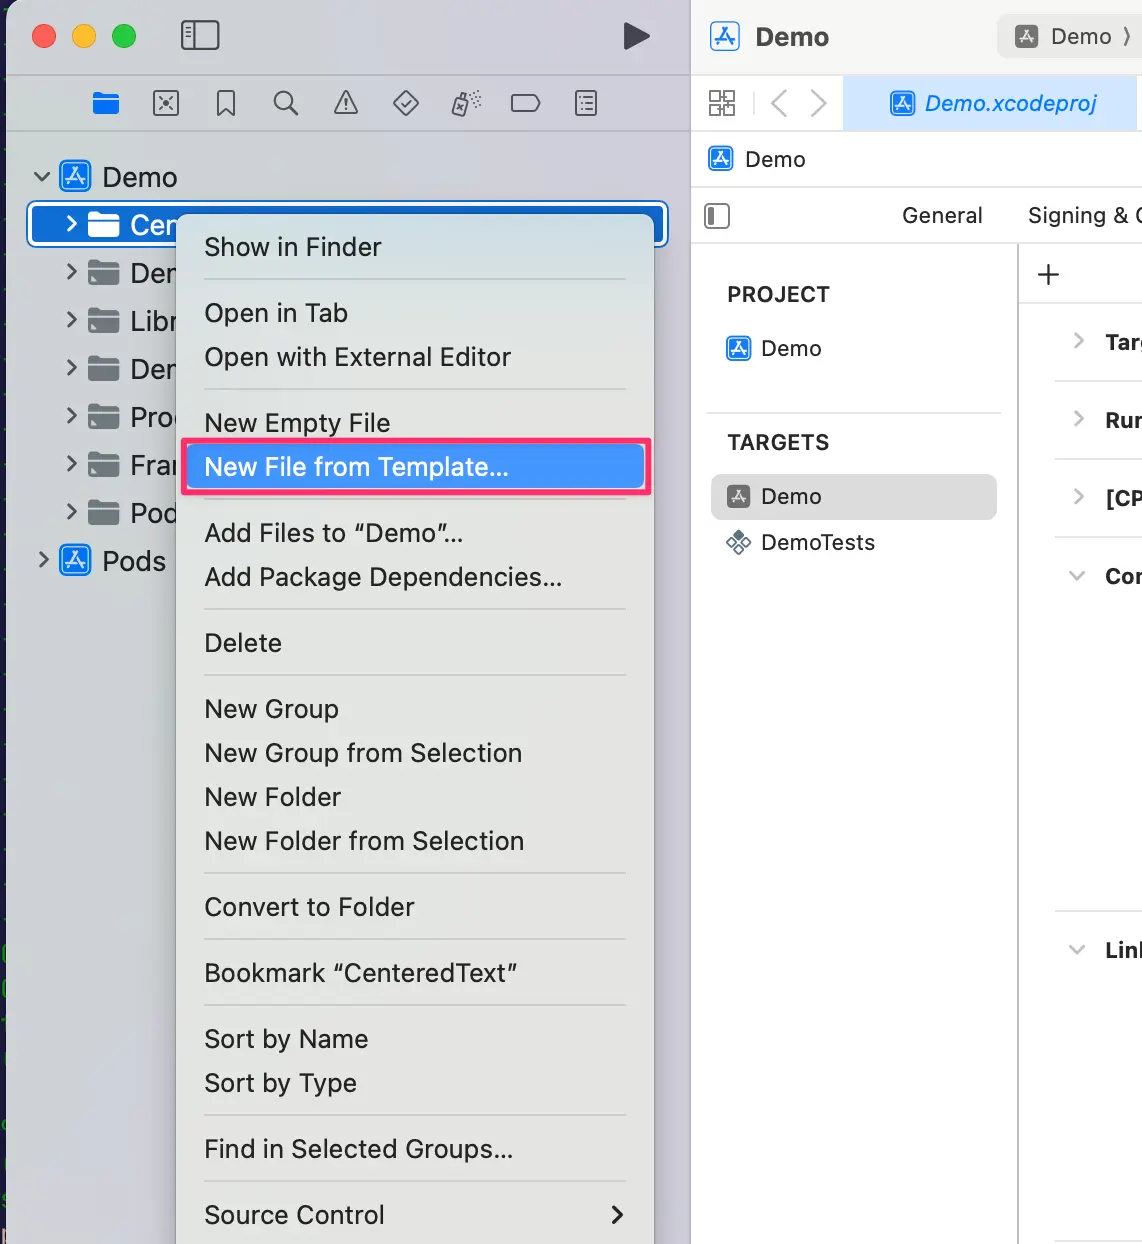
- 选择
Objective-C File模板,命名为RCTWebView
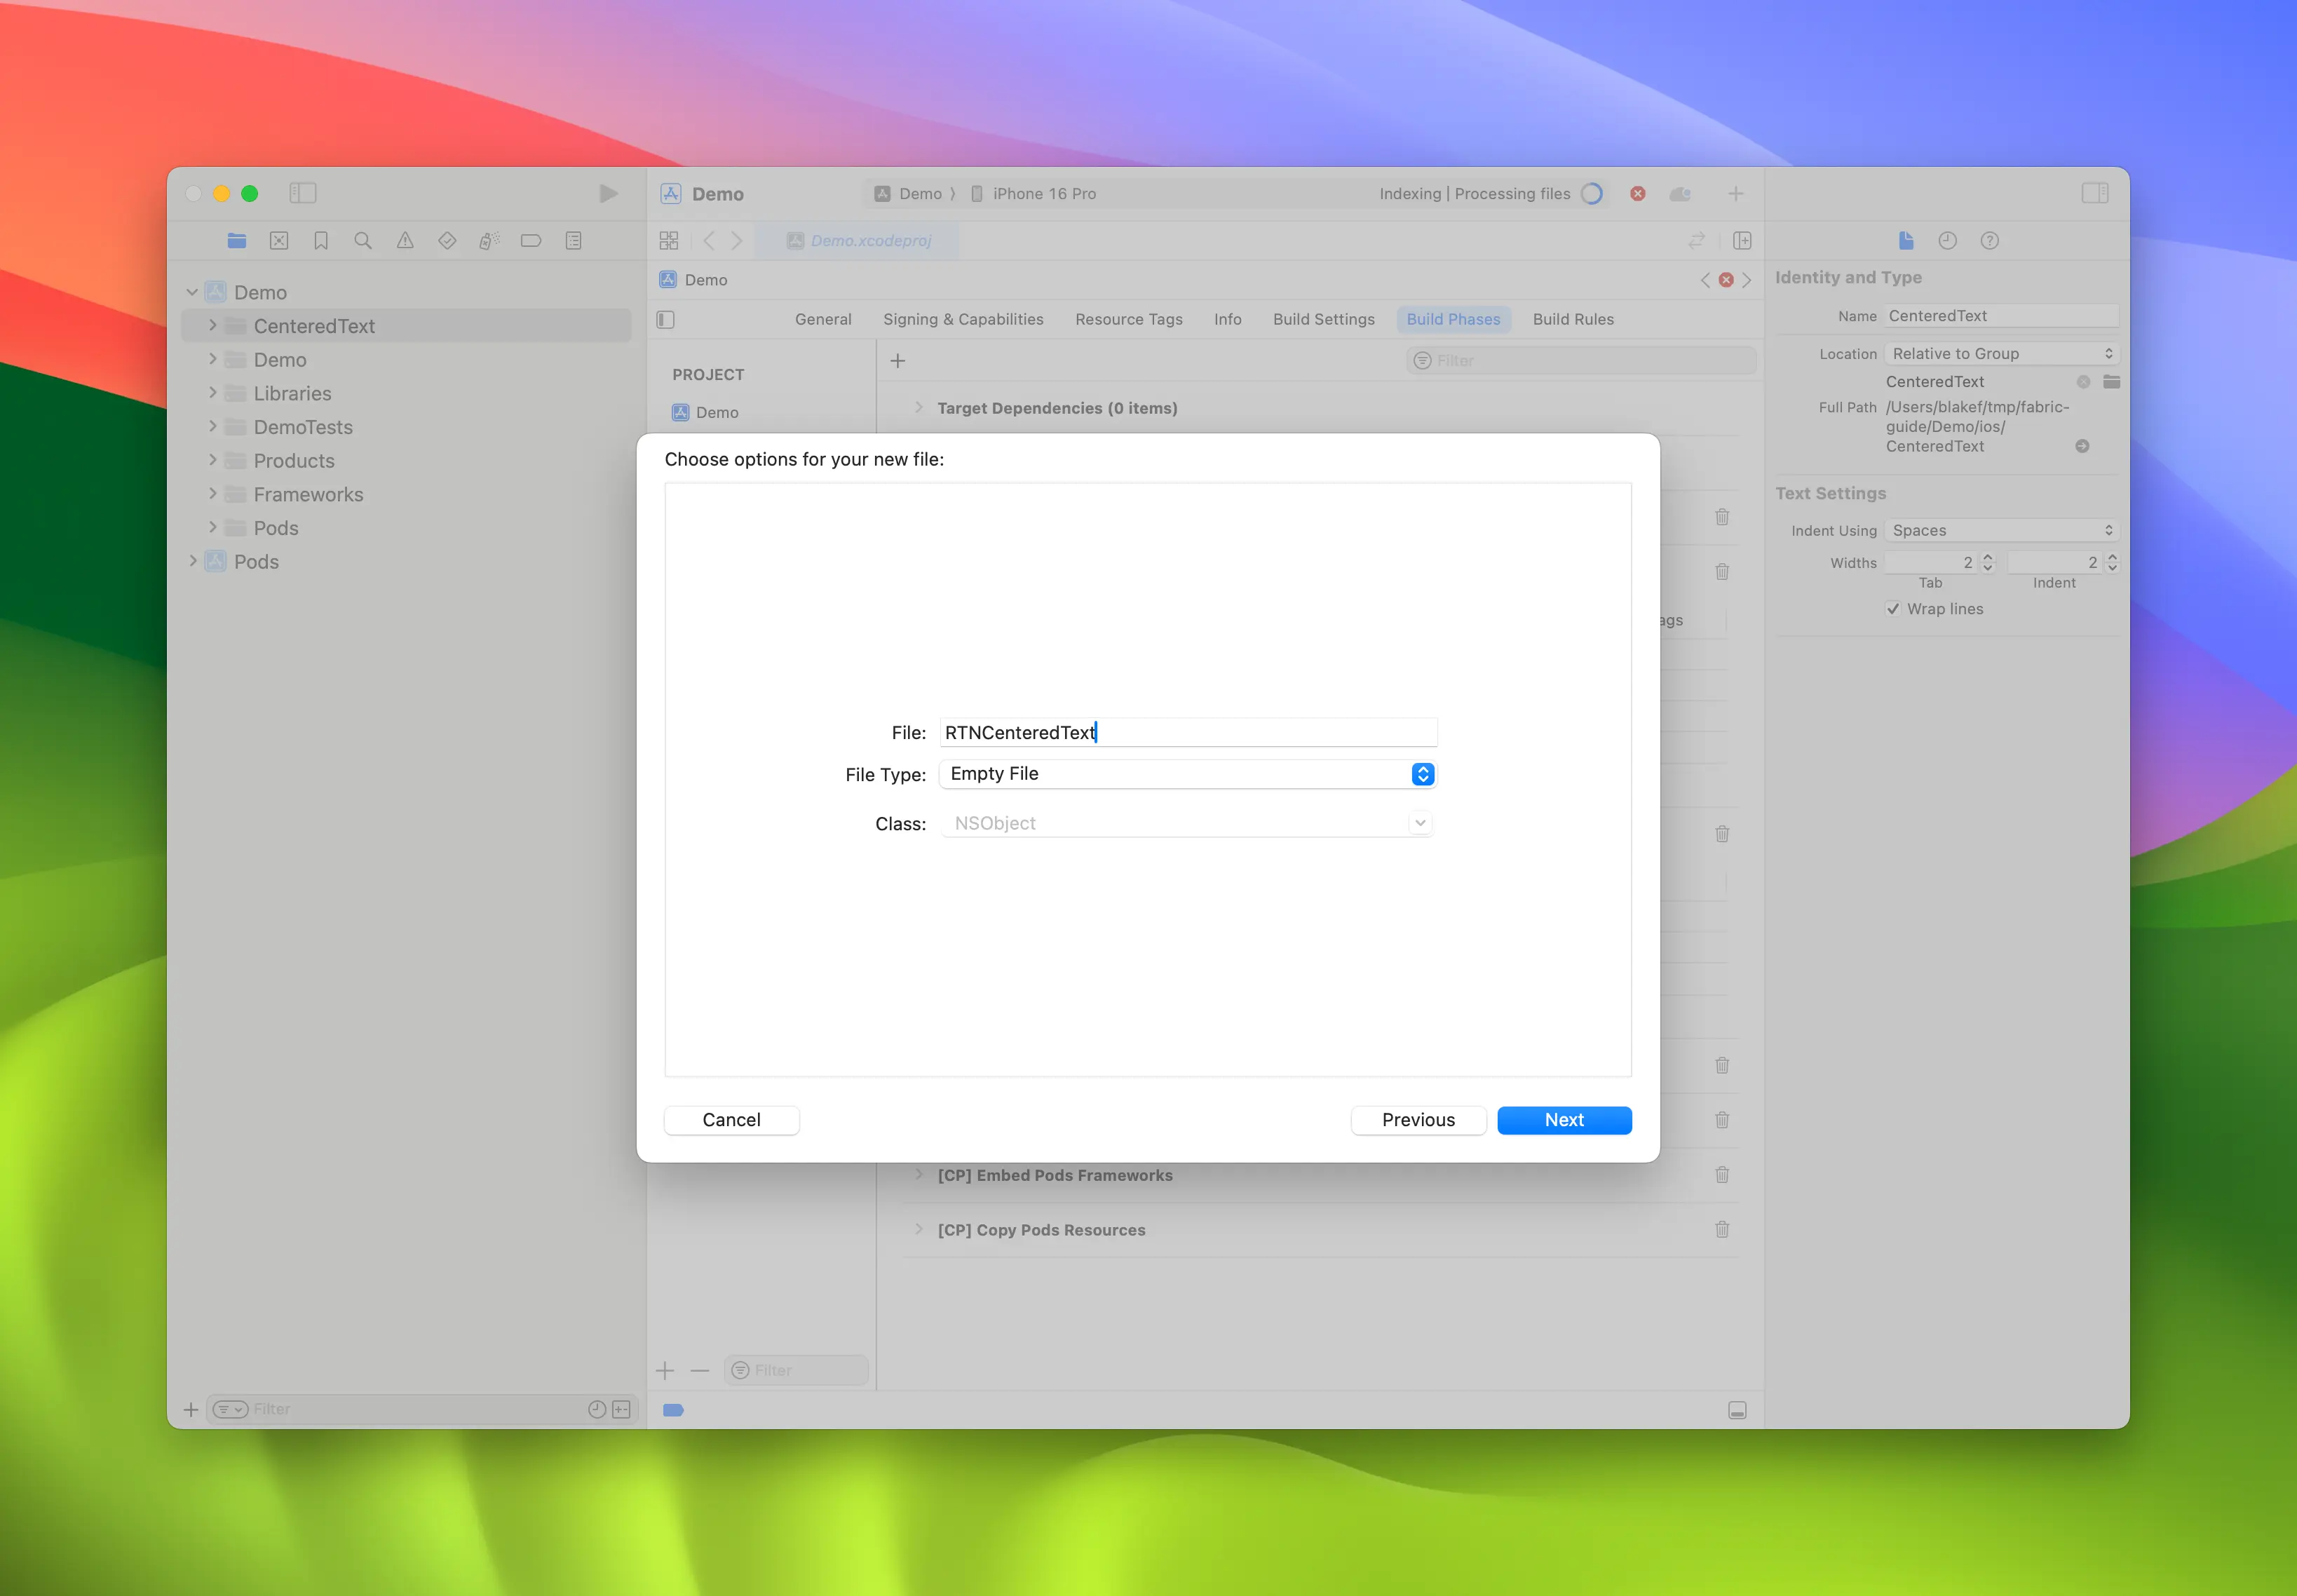
-
重复步骤 4,创建名为
RCTWebView.h的头文件 -
将
RCTWebView.m重命名为RCTWebView.mm,使其成为 Objective-C++ 文件
Podfile
...
Demo
├── AppDelegate.swift
...
├── RCTWebView.h
└── RCTWebView.mm
创建头文件和实现文件后,即可开始实现具体功能
以下是声明组件接口的 RCTWebView.h 文件代码:
#import <React/RCTViewComponentView.h>
#import <UIKit/UIKit.h>

NS_ASSUME_NONNULL_BEGIN

@interface RCTWebView : RCTViewComponentView

// You would declare native methods you'd want to access from the view here

@end

NS_ASSUME_NONNULL_END
该类定义了继承自 RCTViewComponentView 的 RCTWebView。该类是 React Native 提供的所有原生组件的基类。
实现文件 (RCTWebView.mm) 的代码如下:
#import "RCTWebView.h"

#import <react/renderer/components/AppSpec/ComponentDescriptors.h>
#import <react/renderer/components/AppSpec/EventEmitters.h>
#import <react/renderer/components/AppSpec/Props.h>
#import <react/renderer/components/AppSpec/RCTComponentViewHelpers.h>
#import <WebKit/WebKit.h>

using namespace facebook::react;

@interface RCTWebView () <RCTCustomWebViewViewProtocol, WKNavigationDelegate>
@end

@implementation RCTWebView {
  NSURL * _sourceURL;
  WKWebView * _webView;
}

-(instancetype)init
{
  if(self = [super init]) {
    _webView = [WKWebView new];
    _webView.navigationDelegate = self;
    [self addSubview:_webView];
  }
  return self;
}

- (void)updateProps:(Props::Shared const &)props oldProps:(Props::Shared const &)oldProps
{
  const auto &oldViewProps = *std::static_pointer_cast<CustomWebViewProps const>(_props);
  const auto &newViewProps = *std::static_pointer_cast<CustomWebViewProps const>(props);

  // Handle your props here
  if (oldViewProps.sourceURL != newViewProps.sourceURL) {
    NSString *urlString = [NSString stringWithCString:newViewProps.sourceURL.c_str() encoding:NSUTF8StringEncoding];
    _sourceURL = [NSURL URLWithString:urlString];
    if ([self urlIsValid:newViewProps.sourceURL]) {
      [_webView loadRequest:[NSURLRequest requestWithURL:_sourceURL]];
    }
  }

  [super updateProps:props oldProps:oldProps];
}

-(void)layoutSubviews
{
  [super layoutSubviews];
  _webView.frame = self.bounds;

}

#pragma mark - WKNavigationDelegate

-(void)webView:(WKWebView *)webView didFinishNavigation:(WKNavigation *)navigation
{
  CustomWebViewEventEmitter::OnScriptLoaded result = CustomWebViewEventEmitter::OnScriptLoaded{CustomWebViewEventEmitter::OnScriptLoadedResult::Success};
  self.eventEmitter.onScriptLoaded(result);
}

- (BOOL)urlIsValid:(std::string)propString
{
  if (propString.length() > 0 && !_sourceURL) {
    CustomWebViewEventEmitter::OnScriptLoaded result = CustomWebViewEventEmitter::OnScriptLoaded{CustomWebViewEventEmitter::OnScriptLoadedResult::Error};

    self.eventEmitter.onScriptLoaded(result);
    return NO;
  }
  return YES;
}

// Event emitter convenience method
- (const CustomWebViewEventEmitter &)eventEmitter
{
  return static_cast<const CustomWebViewEventEmitter &>(*_eventEmitter);
}

+ (ComponentDescriptorProvider)componentDescriptorProvider
{
  return concreteComponentDescriptorProvider<CustomWebViewComponentDescriptor>();
}

@end
这段 Objective-C++ 代码包含以下关键细节:
-
@interface实现了两个协议:- Codegen 生成的
RCTCustomWebViewViewProtocol - WebKit 框架提供的
WKNavigationDelegate(用于处理 Web 视图导航事件)
- Codegen 生成的
-
init方法:实例化WKWebView,将其添加为子视图,并设置navigationDelegate -
updateProps方法:当组件的属性变化时由 React Native 调用 -
layoutSubviews方法:定义自定义视图的布局方式 -
webView:didFinishNavigation:方法:处理WKWebView完成页面加载后的操作 -
urlIsValid:(std::string)propString方法:验证接收的 URL 属性是否有效 -
eventEmitter方法:用于获取强类型eventEmitter实例的工具方法 -
componentDescriptorProvider:返回 Codegen 生成的ComponentDescriptor
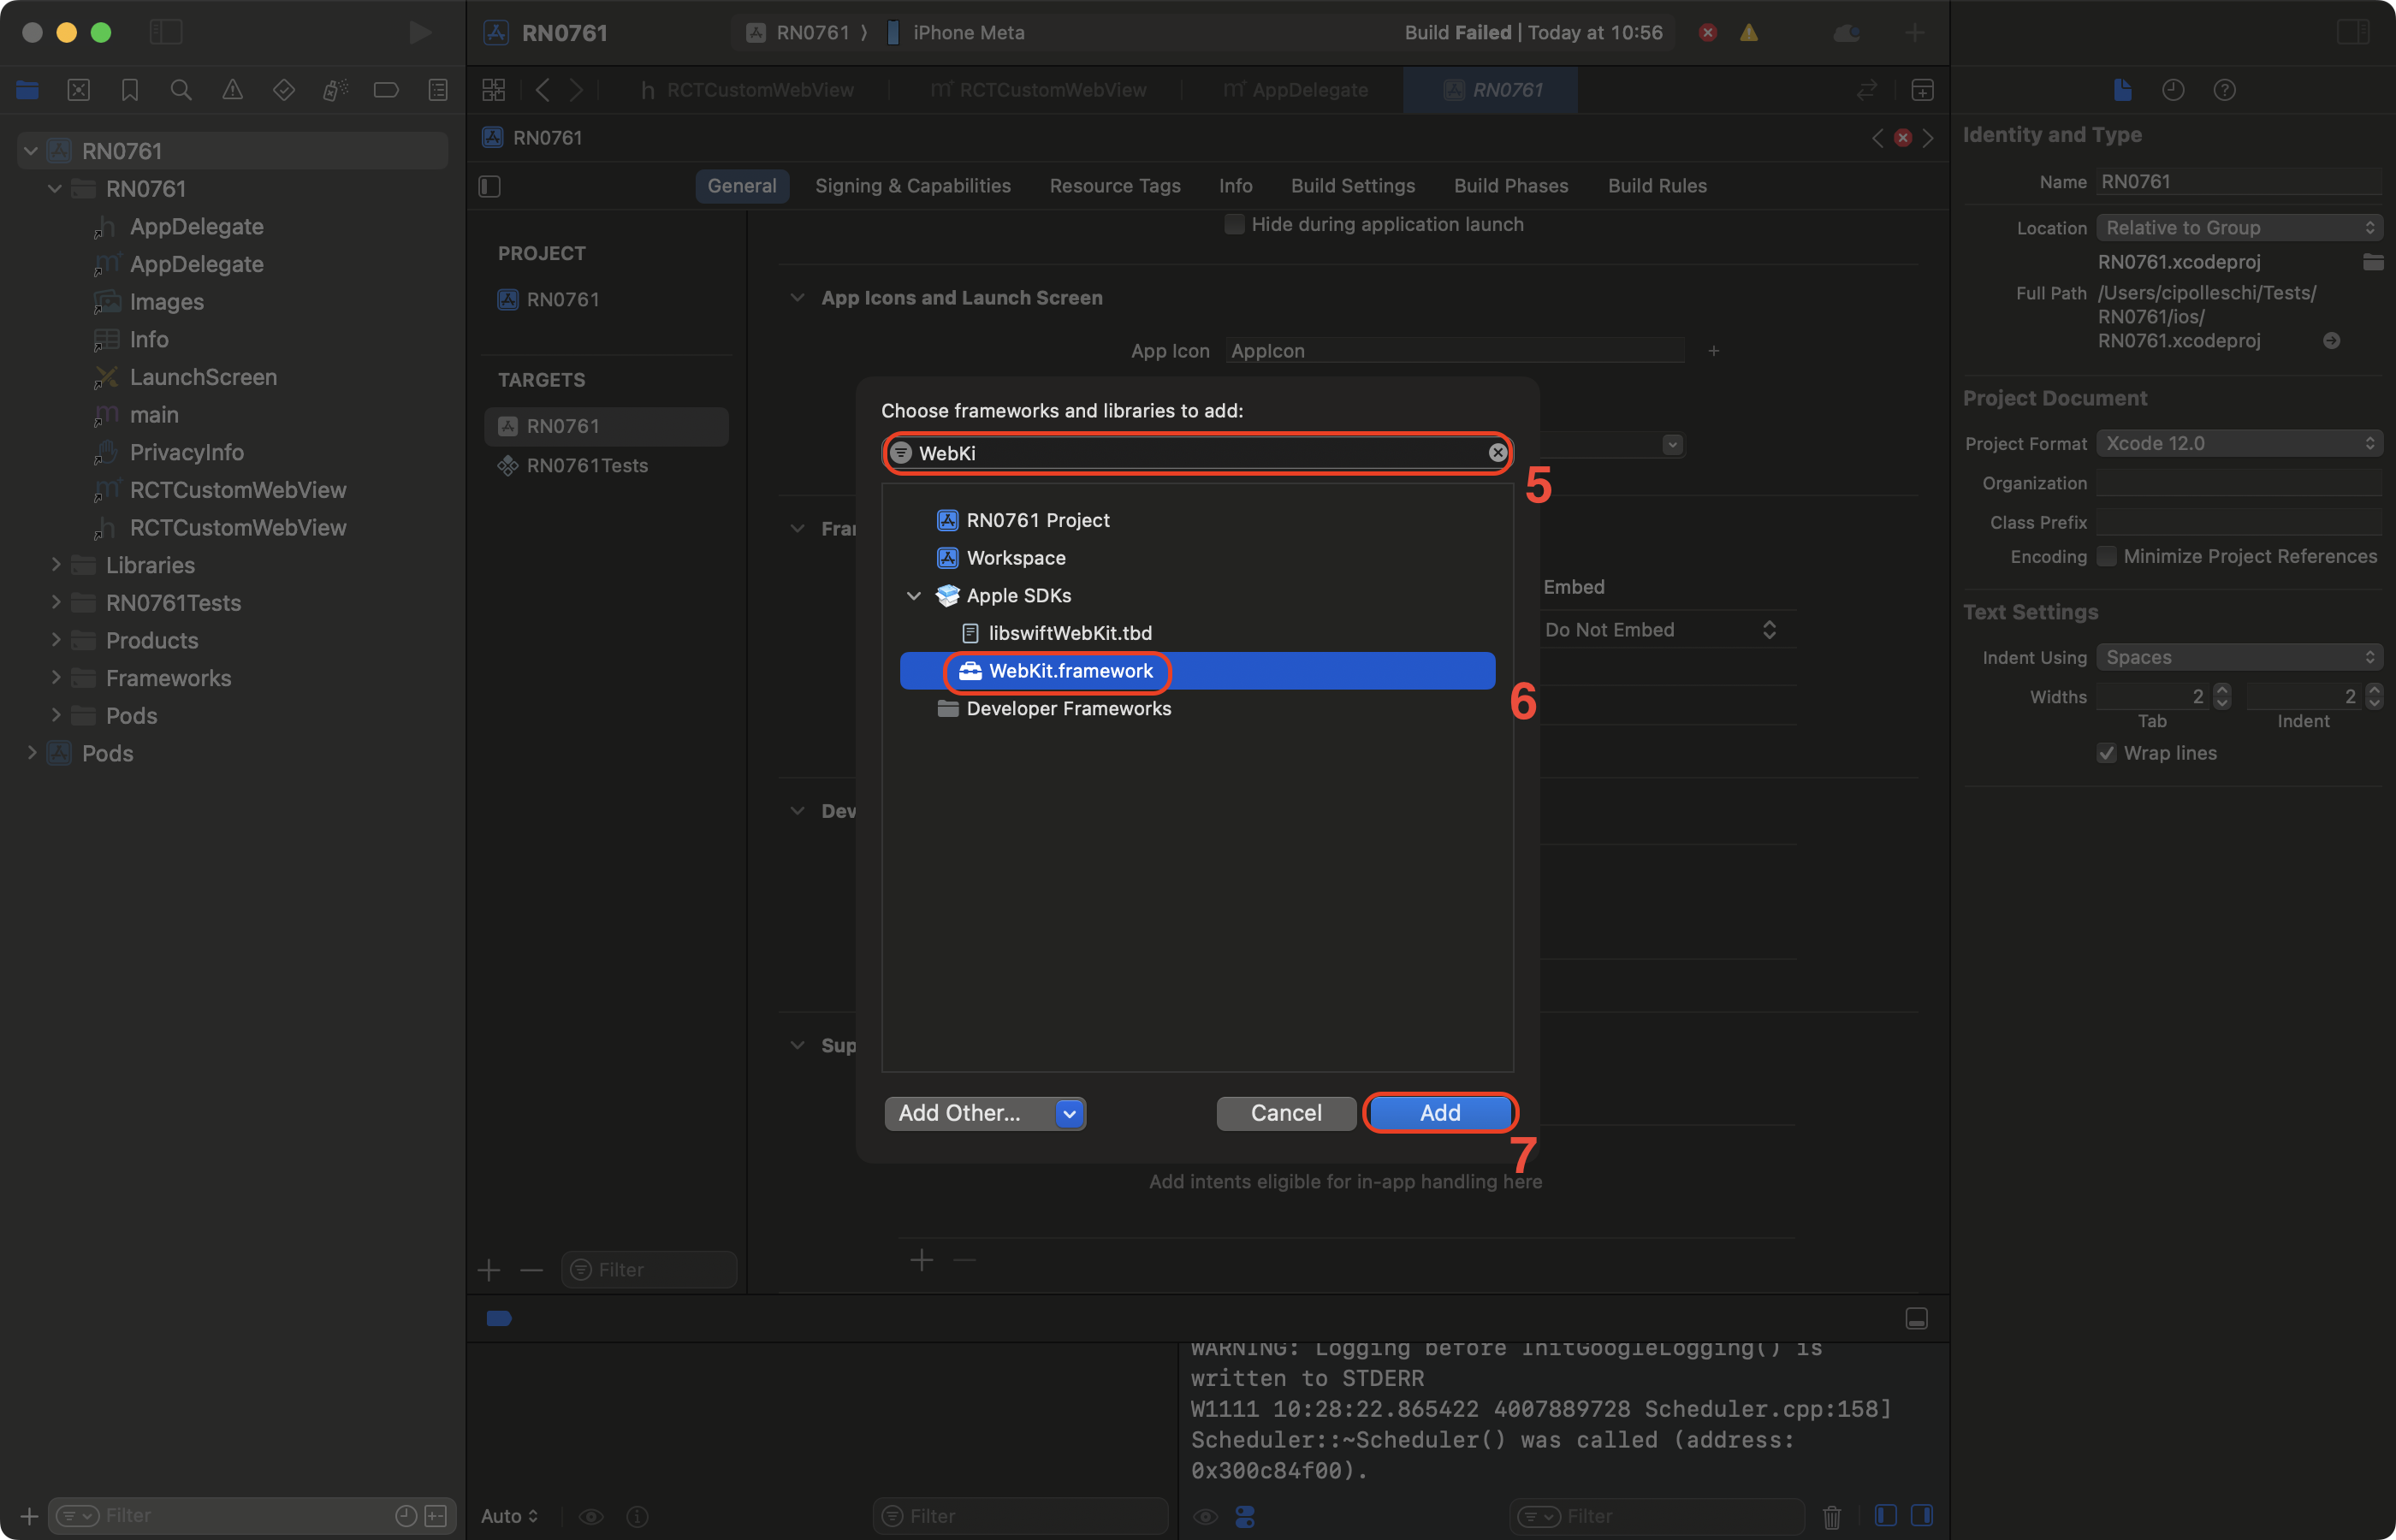
添加 WebKit 框架
此步骤仅因我们创建 Web 视图而需要。iOS 上的 Web 组件需要链接苹果提供的 WebKit 框架。若您的组件无需访问 Web 特有功能,可跳过此步骤。
Web 视图需要访问苹果通过 Xcode 和设备内置框架提供的某些功能:WebKit。
在原生代码中可通过 RCTWebView.mm 文件添加的 #import <WebKit/WebKit.h> 行查看此依赖。
要在应用中链接 WebKit 框架,请按以下步骤操作:
-
在 Xcode 中点击您的项目
-
选择应用程序目标
-
选择 General 标签页
-
向下滚动至 "Frameworks, Libraries, and Embedded Contents" 区域,点击
+按钮
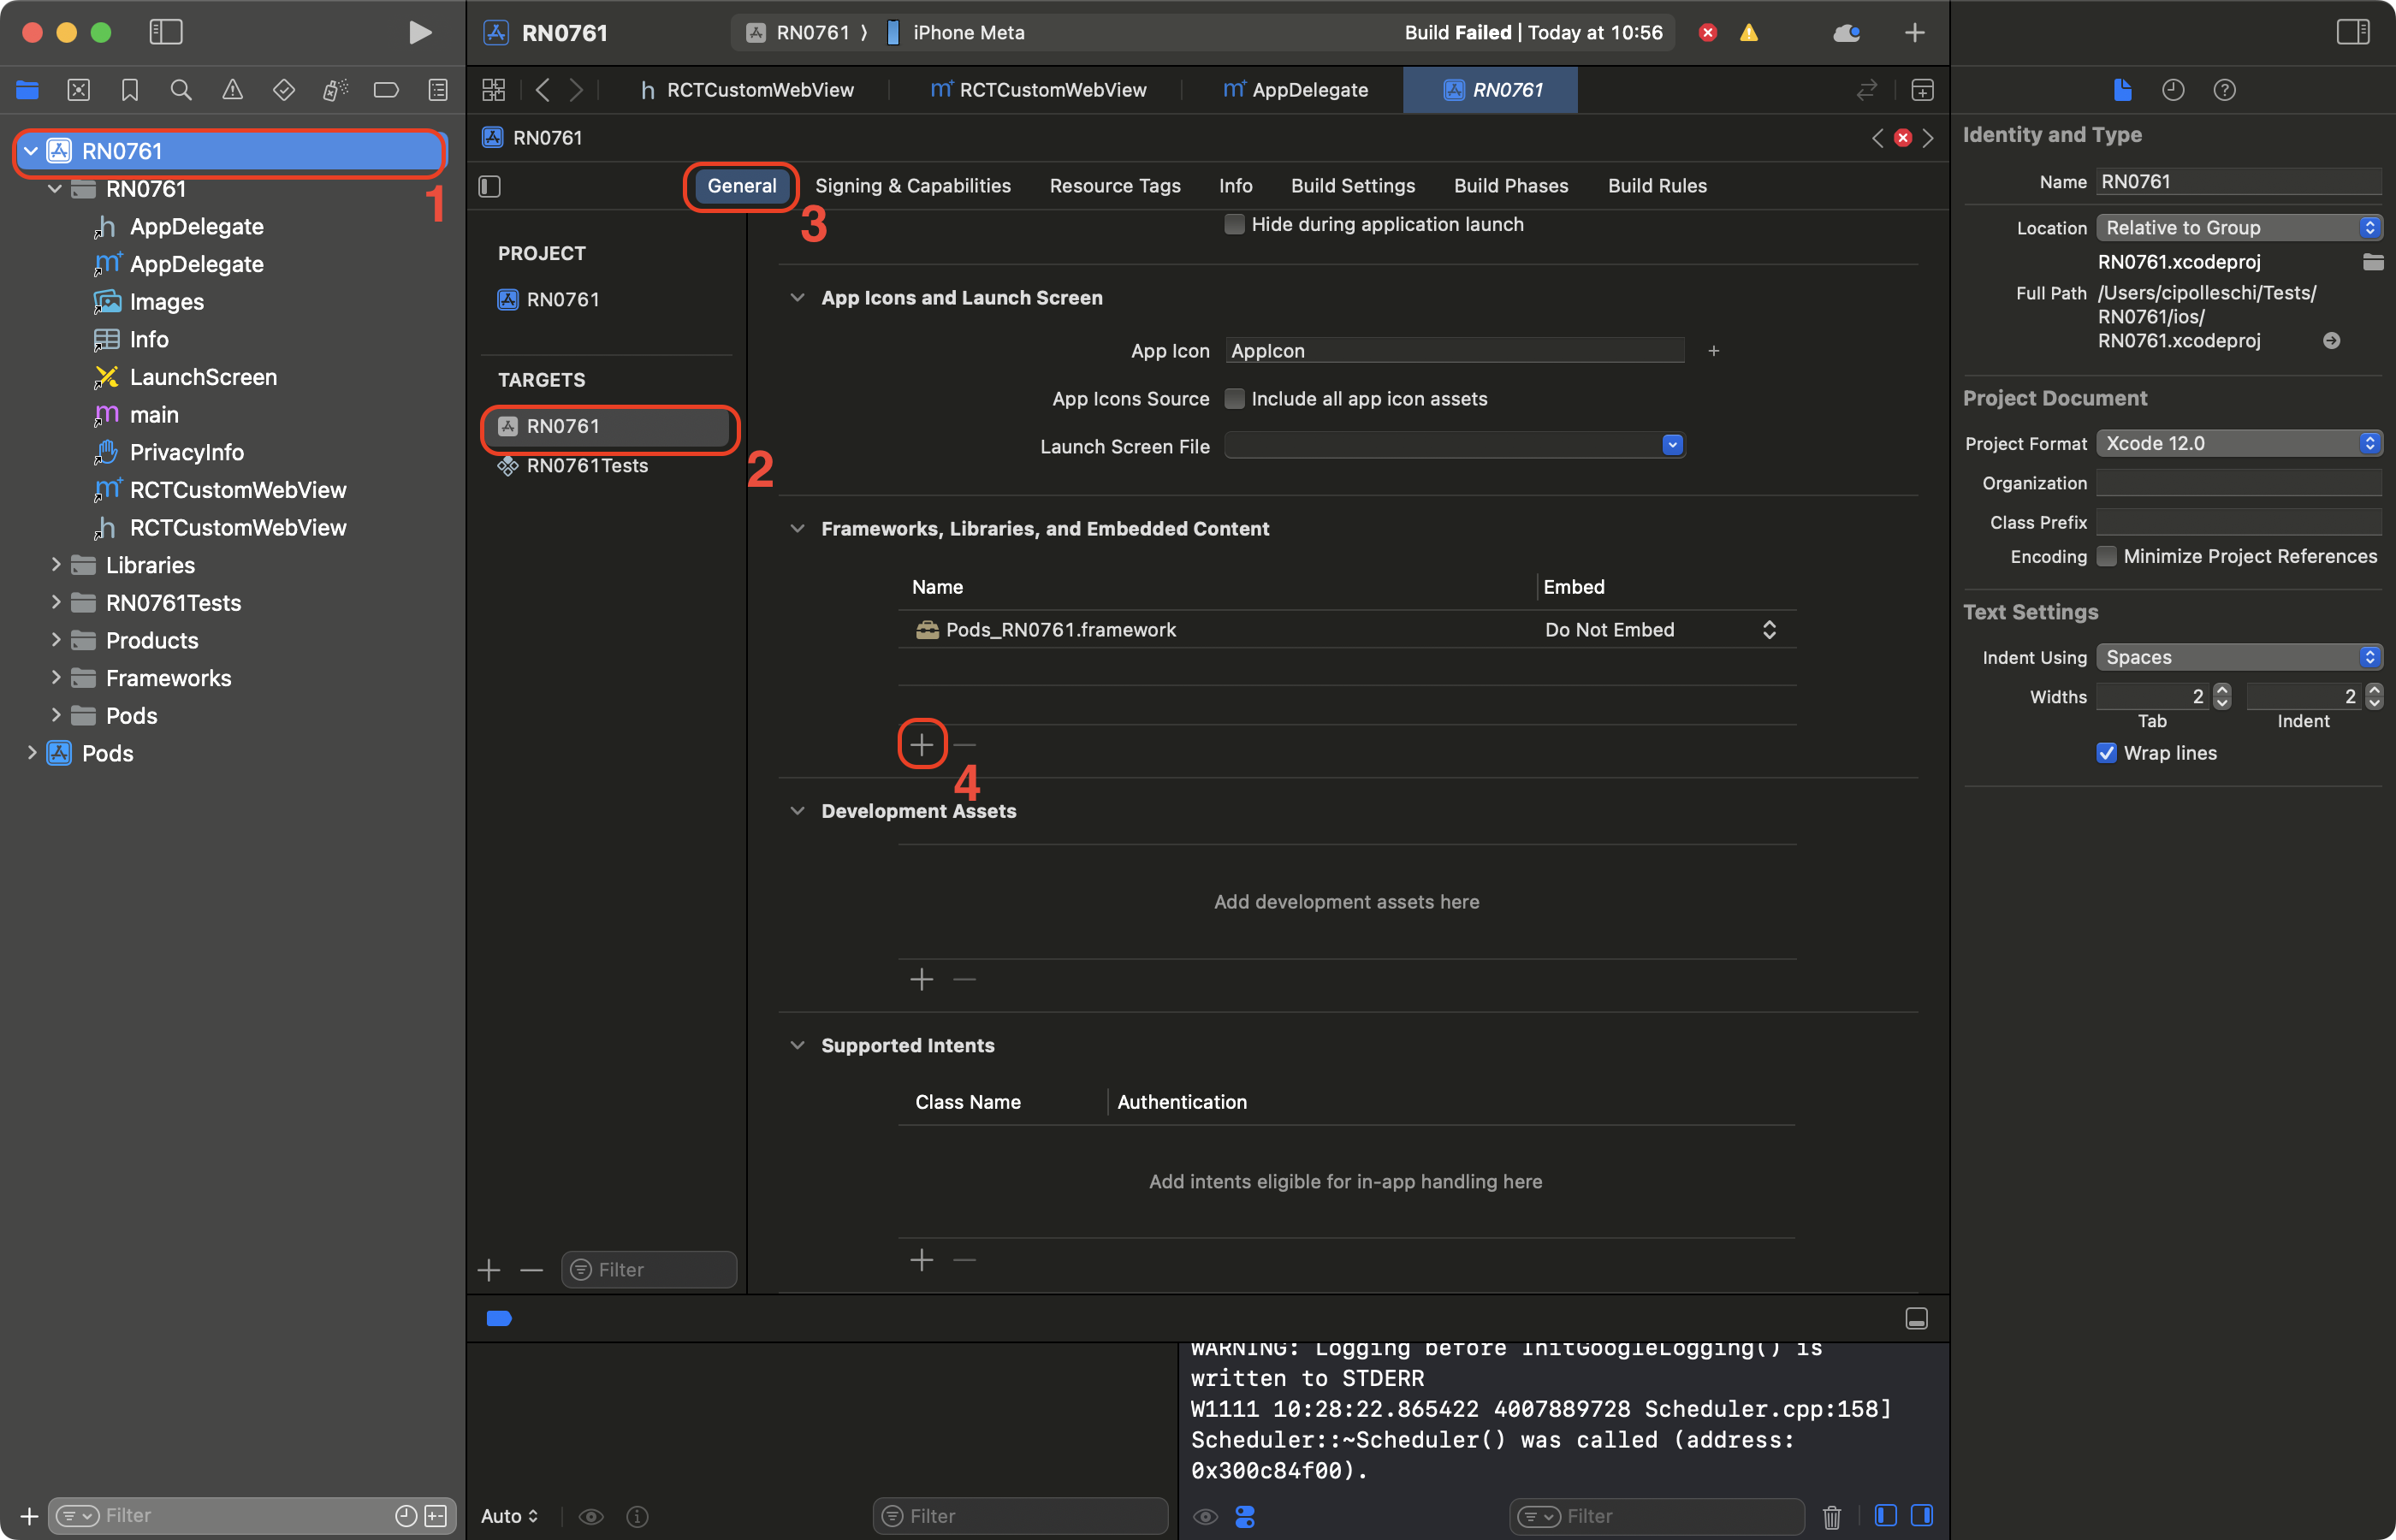
-
在搜索栏中筛选 WebKit
-
选择 WebKit 框架
-
点击 Add 按钮
3. 使用您的原生组件
最后,您可以在应用中使用新组件。更新生成的 App.tsx 文件如下:
import React from 'react';
import {Alert, StyleSheet, View} from 'react-native';
import WebView from './specs/WebViewNativeComponent';

function App(): React.JSX.Element {
  return (
    <View style={styles.container}>
      <WebView
        sourceURL="https://react.dev/"
        style={styles.webview}
        onScriptLoaded={() => {
          Alert.alert('Page Loaded');
        }}
      />
    </View>
  );
}

const styles = StyleSheet.create({
  container: {
    flex: 1,
    alignItems: 'center',
    alignContent: 'center',
  },
  webview: {
    width: '100%',
    height: '100%',
  },
});

export default App;
这段代码创建了一个使用我们新开发的 WebView 组件加载 react.dev 网站的应用。
该应用还会在网页加载完成后显示提示信息。
4. 使用 WebView 组件运行应用
- Android
- iOS
yarn run android
yarn run ios
| Android | iOS |
|---|---|
 | 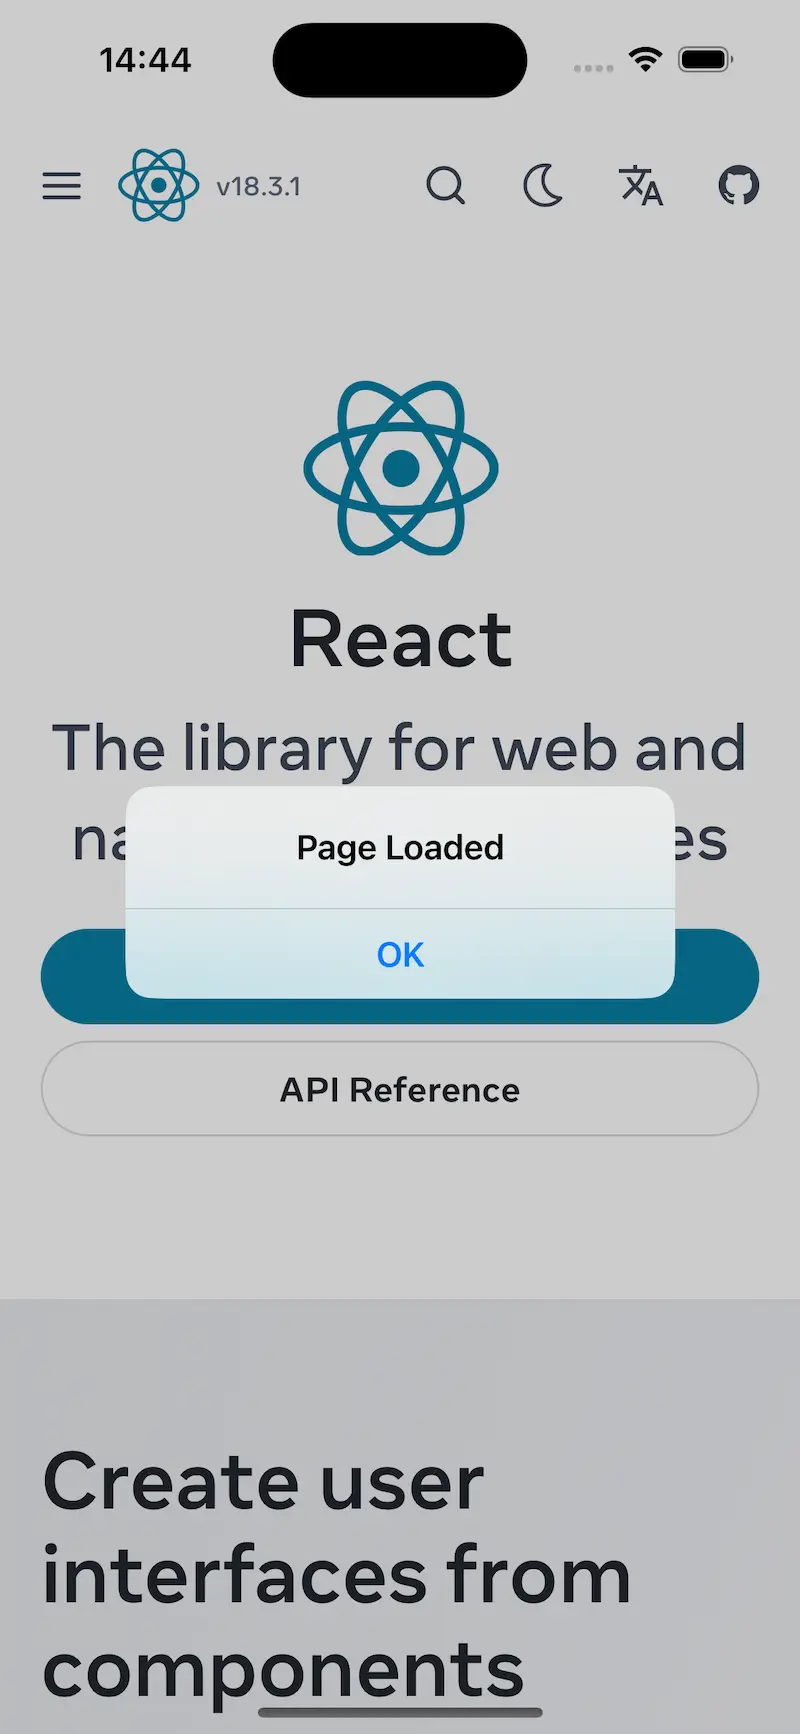 |